Live website updates with Go, SSE, and htmx

In case you missed the memo, the Single Page Application hype period is over, and we’re now back to PHP and jQuery,
I mean rendering HTML on the server. I’m excited! It brings me back to the early 2000s when we were all web developers,
not frontend or backend engineers.
But there’s one thing I would miss from the SPA era: live updates. The classic websites often relied on the “refresh” button, which wasn’t that great. While polling for updates periodically is a solution, it’s inefficient. It’s much better to push updates to the client once they happen.
This post shows how to push live updates to your website using Go, Server-Sent Events (SSE), and htmx. As the example project, I use a tiny microblogging website where you can react to posts.
Below, you can see the embedded example in two “windows”. You can click on reactions and see them update in real-time in the other window. You will also see the reactions and views counters update as other readers interact with the posts. (You can open the example in a new tab here).
Server-Sent Events
WebSockets seem like the most popular option for pushing live updates from the HTTP server to the browser. Meanwhile, Server-Sent Events (SSE) is a great alternative. It is simple to set up and good enough for many use cases. It uses standard HTTP connections, so you don’t need a custom protocol. All modern browsers support SSE.
SSE endpoints work just like standard HTTP endpoints with a slight twist.
You set the Content-Type header to text/event-stream and keep writing data in a text format like this:
event: notifications
data: {"unread_messages": 14}

event: message
data: <h1>Hello,
data: world!</h1>
What follows the event: line is an optional event type, which can be any string you want.
The multiline data field is the payload sent to the browser.
Every “event” is separated by an extra new line.
The specification mentions a few more things, but that’s all you need to start.
In Go, SSE endpoints are slightly different from net/http endpoints because you don’t just write data to the
ResponseWriter and return from the function. Instead, you reply with the status code (200 OK) and keep writing
the “events” in the format above. The connection stays alive until the client (the browser) closes it.
Here’s a complete example of sending back a “ping” event every 10 seconds.
func main() {
	http.HandleFunc("/ping", func(w http.ResponseWriter, r *http.Request) {
		w.Header().Set("Content-Type", "text/event-stream")
		w.WriteHeader(http.StatusOK)

		for {
			select {
			case <-r.Context().Done():
				return
			default:
			}

			fmt.Fprintf(w, "data: ping\n\n")

			if f, ok := w.(http.Flusher); ok {
				f.Flush()
			}

			time.Sleep(10 * time.Second)
		}
	})

	http.ListenAndServe(":8080", nil)
}
Two things are worth mentioning here.
- To avoid buffering, we use the
http.Flusherto send the response immediately. - To exit the infinite loop, we check if the request’s context is done.
On the client side, you can handle it like this:
<script>
    const es = new EventSource("http://localhost:8080/ping");
    es.onmessage = (event) => {
        console.log(`Received: ${event.data}`);
    };
</script>
Most online tutorials end here and wish you happy coding. Perhaps it’s good enough if you want to create a demo project in one afternoon. But the example is far from something you would use in production. I don’t want you to read this post, then go back to your project and think, “Uhh, so what do I do now?”
If you follow our blog, you know we like to focus on real-world examples. Let’s see how to use SSE in a more complex scenario — the microblog example you saw at the top of this page. It’s not quick and easy, and there are many things to consider, but it should make you comfortable enough to use a similar mechanism in your projects.
Join over 15k subscribers of our newsletter and get a free e-book!
Go With The Domain Three Dots Labs
The Microblog Example
The core component of the example is a “post”. The key feature is that the reactions and views are updated in real-time as other users interact with the post.
In this example, we’ll render HTML on the server side, using no JavaScript code for interactivity except the htmx library.
The complete example is on GitHub. You can run it locally using docker-compose.
Note
JSON API Example
For another example featuring a Twitter-like web app, see the server-sent-events example on the Watermill repository. It shows a similar approach using a Single Page Application with Vue.js and a JSON API.
Tools used
Here’s the stack I use in the example. I won’t dive deep into all the components, but I’ll mention them briefly here.
- Echo — a lightweight HTTP router I like for error handling that is simpler than in
net/http. - templ — an HTML templates library based on code generation. It can get weird at times, but overall, I’m happy with it and like it more than
html/template. It’s best used together with an IDE plugin. - htmx — a library for using AJAX and SSE with no need to write JavaScript.
- Watermill — an event-driven library we maintain for working with messages.
- PostgreSQL and Google Cloud Pub/Sub for storage and messaging infrastructure. (You can choose a different Pub/Sub for messaging, even Postgres.)
Deciding what and when to push
When designing an SSE endpoint, you must decide what the payload should be, when to send an update, and to whom to send it.
What
The payload is just text, and it’s up to you how to encode it.
It can be a regular JSON API response or an HTML you would embed directly on the website.
Remember that each line should have the data: prefix, and the payload needs to end with two new lines (\n\n).
When
You need a way to know when something changes in your application so you can push the updates. For example, if the user receives a message, you show a red bubble in the UI.
The SSE endpoints are long-running, so you may have hundreds or thousands of goroutines running in the background that you must notify of the change. In reaction, each should send an event to the client. Since you’re likely running more than one instance of your service, this can’t work in memory.
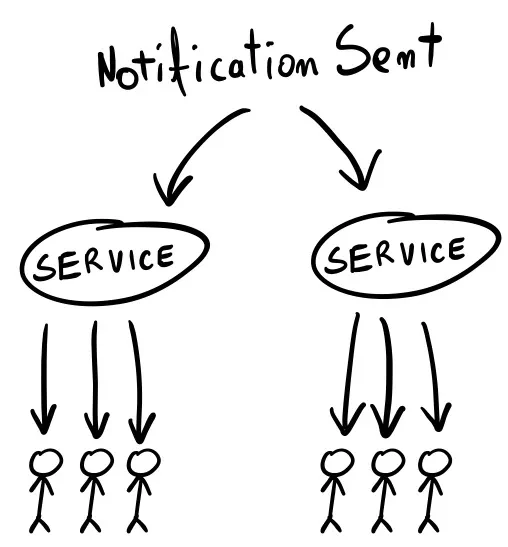
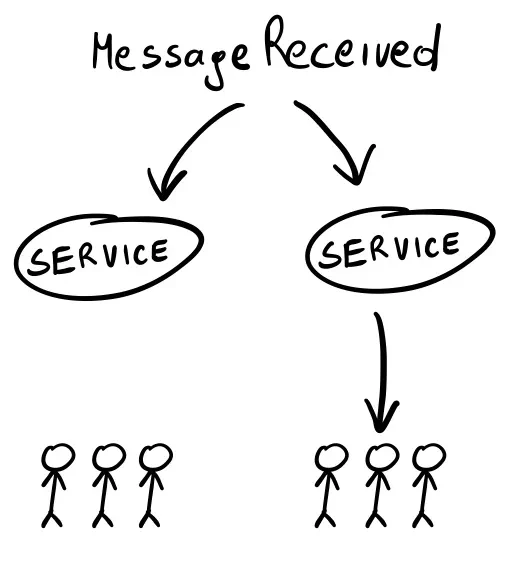
To Whom
You often only want to notify some users of something that happened. If I send you a message, I expect a notification to appear on your screen, but not for anyone else. So, you need a way to filter what happens and choose who should get the update (and which SSE endpoints to trigger).
In this example, it goes as follows:
- What: the post “stats” model, including the numbers of views and reactions as HTML.
- When: when someone sees the post or reacts to it.
- To Whom: everyone who sees the updated post. Other posts are not updated.
Implementing SSE Endpoints
While you absolutely can create SSE endpoints from scratch (or with a library), and it’s not that complex, the hard part is triggering the updates in reaction to something that happened. (And doing this over the network since running a single service instance rarely happens in production.) As with running an HTTP server, you don’t want to reinvent the wheel here.
We usually approach anything events-related with Watermill. It’s a Go library we maintain that abstracts away the low-level details of Pub/Subs. (Getting close to 7k GitHub stars ⭐️). You can use it with any existing codebase as it’s not a framework but a lightweight library (just like htmx). It supports many Pub/Subs, so it’s easy to start with the infrastructure you already have (even an SQL database).
Watermill Primer
(Feel free to skip this part if you’re already familiar with Watermill.)
The documentation goes in-depth on how Watermill works. Below is a TL;DR version.
First, you need a Pub/Sub — a system that lets you work with messages across the network (also known as a “message broker” or a “queue”). Common picks are Kafka or RabbitMQ, but it could just as well be an SQL database.
Watermill abstracts away all Pub/Subs into two interfaces:
type Publisher interface {
	Publish(topic string, messages ...*Message) error
	Close() error
}

type Subscriber interface {
	Subscribe(ctx context.Context, topic string) (<-chan *Message, error)
	Close() error
}
You can Publish messages and Subscribe to them.
There’s always a topic involved — a string that decides who gets the message.
Here’s basic Watermill architecture in one picture:
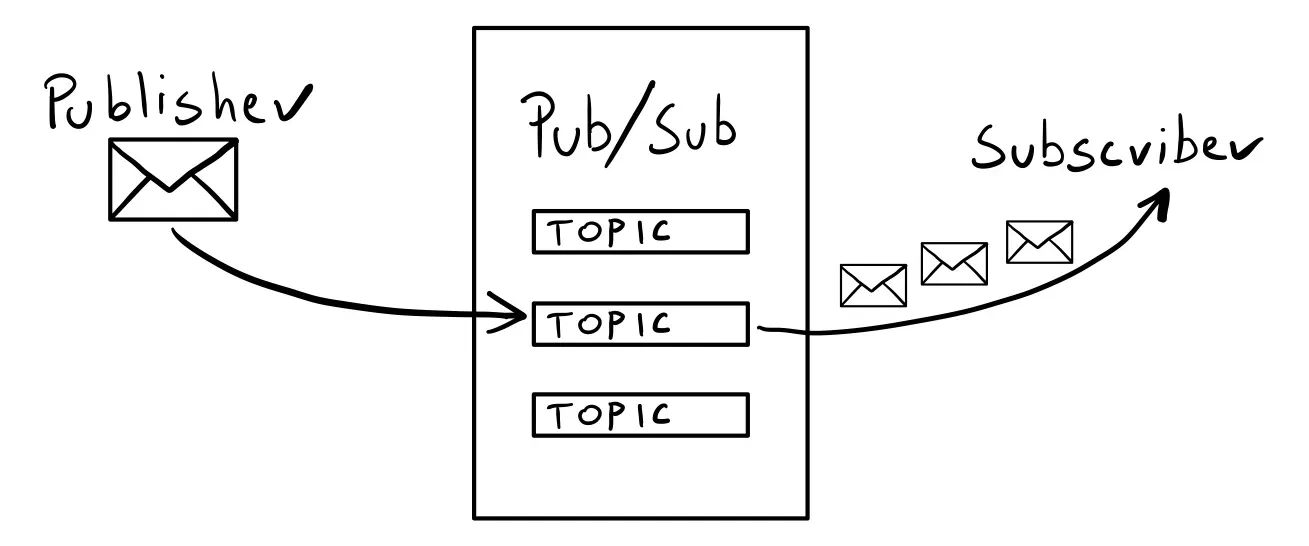
The core part of Watermill is the Message.
It is what the Request is for the net/http package.
The simplest message has just an optional ID and a payload.
The payload is a slice of bytes, so you can use any marshaling you want (JSON, Protocol Buffers, plain strings, etc.).
msg := message.NewMessage(watermill.NewUUID(), []byte("Hello, world!"))
While all Watermill’s components are based on the Publisher and Subscriber interfaces, using them directly is
a relatively low-level API.
In this example, we’ll use the CQRS component of Watermill, which is a higher-level API.
It’s based on the same ideas but removes some boilerplate, like serialization and deserialization.
We’ll use the EventBus to publish events and EventProcessor to subscribe to them.
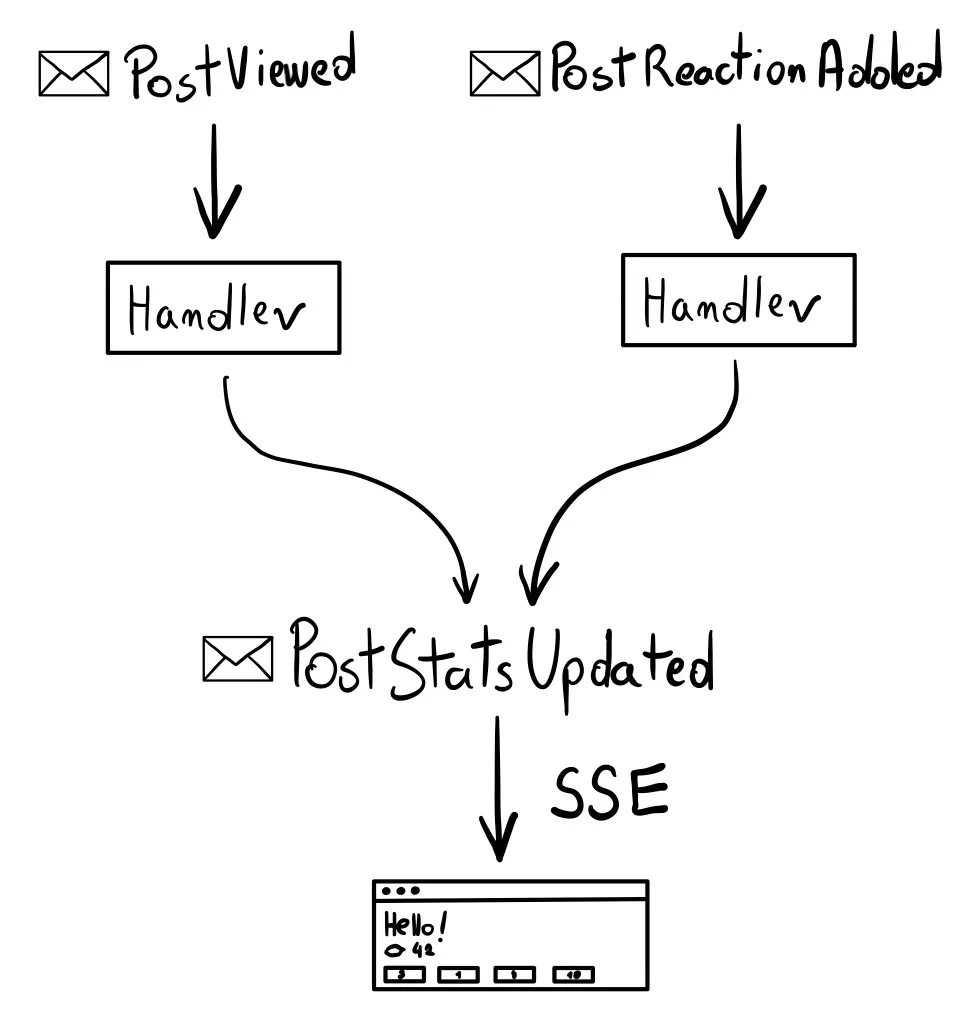
High-level architecture overview
We want to publish two events:
PostViewedis published when someone sees the post.PostReactionAddedis published when someone reacts to a post.
Each will have an event handler that updates the post’s stats in the database.
(A similar concept as an HTTP handler.)
The handlers should also publish the PostStatsUpdated event.
We will use it to trigger the SSE updates.
Publishing events
First, let’s create a publisher. I use Google Cloud Pub/Sub Publisher, but it can be swapped with any other publisher supported by Watermill. All the configuration needs is a project ID.
(Note that Google Cloud Pub/Sub is just one the Pub/Subs Watermill supports. You could easily change this to another supported Pub/Sub. Kind of like an ORM would work with MySQL, PostgreSQL, and SQLite.)
logger := watermill.NewStdLogger(false, false)

publisher, err := googlecloud.NewPublisher(
    googlecloud.PublisherConfig{
        ProjectID: cfg.PubSubProjectID,
    },
    logger,
)
Publisher works with messages, meaning you must marshal events (structs) into bytes and choose what topics to publish them to. It’s very common to use the same marshaling for all events and topics that follow some convention, like the event name being part of them.
We will use the EventBus component to simplify the publishing API.
You can think of it as a high-level wrapper on the publisher (as you can see, it’s the first argument).
You pass the configuration options once and then can publish events with a single method call.
eventBus, err := cqrs.NewEventBusWithConfig(
    publisher,
    cqrs.EventBusConfig{
        GeneratePublishTopic: func(params cqrs.GenerateEventPublishTopicParams) (string, error) {
            return params.EventName, nil
        },
        Marshaler: cqrs.JSONMarshaler{},
        Logger:    logger,
    },
)
The configuration takes a Marshaler, so we use the cqrs.JSONMarshaler{} (all messages will be marshaled to JSON).
The GeneratePublishTopic function returns the topic’s name based on the available parameters.
Instead of passing a topic directly to Publish, we define this function to determine the topic based on the message.
The EventBus calls this function every time a message is published.
In this case, we’ll use the params.EventName.
So, if you consider a struct like this:
type PostViewed struct {
    PostID int `json:"post_id"`
}
It will be published on the PostViewed topic.
(The chosen marshaler provides a way to extract the event name).
Publishing events using the event bus is trivial.
Thanks to the setup of marshaler and GeneratePublishTopic,
we pass the event struct to Publish, and the rest happens behind the scenes.
In the HTTP handler, we can use something like this:
event := PostViewed{
    PostID: post.ID,
}

err = h.eventBus.Publish(ctx, event)
Subscribing to events
I decided to make the HTTP endpoints just publish the events. The event handlers update the post’s stats in the database asynchronously. This way, the client doesn’t need to wait for the changes to be applied, and the view will be eventually updated via SSE.
We need two event handlers to update the stats in the database. The first updates the views count, and the second updates the reactions count.
The CQRS component used for subscribing to events is the EventProcessor.
As with the EventBus, some setup needs to be done initially.
But thanks to this, writing the handlers later will be very pleasant.
The idea behind it is similar to the EventBus, but it’s the other way around.
First, create a Router. It’s a similar concept to the HTTP routers you’re familiar with. The component runs in the background and routes messages to handlers.
router, err := message.NewRouter(message.RouterConfig{}, logger)
Similarly to HTTP routers, Watermill’s router supports middlewares.
For example, you can add the Recoverer middleware so panics in handlers don’t blow up your server.
router.AddMiddleware(middleware.Recoverer)
Now we can create the EventProcessor.
eventProcessor, err := cqrs.NewEventProcessorWithConfig(
    router,
    cqrs.EventProcessorConfig{
        GenerateSubscribeTopic: func(params cqrs.EventProcessorGenerateSubscribeTopicParams) (string, error) {
            return params.EventName, nil
        },
        SubscriberConstructor: func(params cqrs.EventProcessorSubscriberConstructorParams) (message.Subscriber, error) {
            return googlecloud.NewSubscriber(
                googlecloud.SubscriberConfig{
                    ProjectID: cfg.PubSubProjectID,
                    GenerateSubscriptionName: func(topic string) string {
                        return fmt.Sprintf("%v_%v", topic, params.HandlerName)
                    },
                },
                logger,
            )
        },
        Marshaler: cqrs.JSONMarshaler{},
        Logger:    logger,
    },
)
The first argument is the router. It’s similar to how the EventBus “wrapped” the publisher.
Then comes the config. The Marshaler and GenerateSubscribeTopic are the same concepts as in the EventBus.
The only difference is they come at the other end of the Pub/Sub.
In the EventBus, the marshaler marshals the message, and the function decides to which topic to publish it.
Here, the Marshaler unmarshals the message back on the struct, and
GenerateSubscribeTopic decides to which topic to subscribe to.
SubscriberConstructor is what the name says: it returns a new Subscriber.
You may wonder, why not use a single subscriber, as we did with the publisher in the EventBus?
Publishing messages is straightforward: you marshal a struct, send the bytes to a topic, and you’re done. Subscribing is where things get more interesting. For example, you run two replicas of the same service. How do you ensure that only one replica receives a message from the Pub/Sub?
The strategy depends on the Pub/Sub.
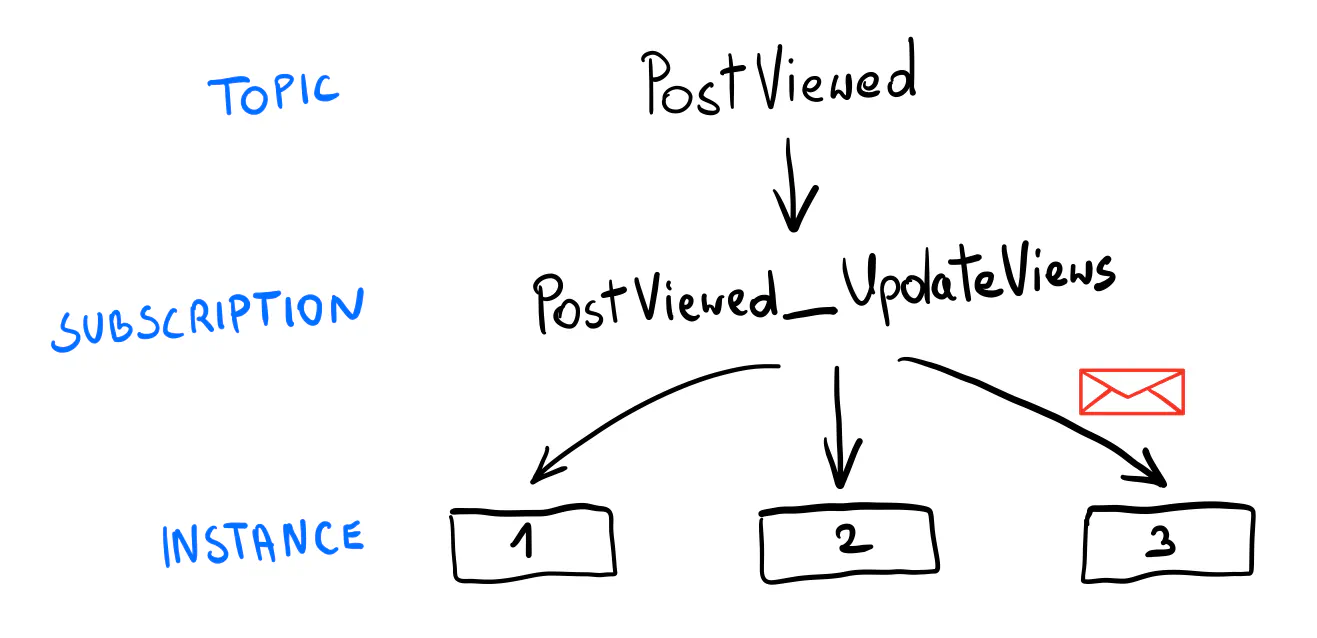
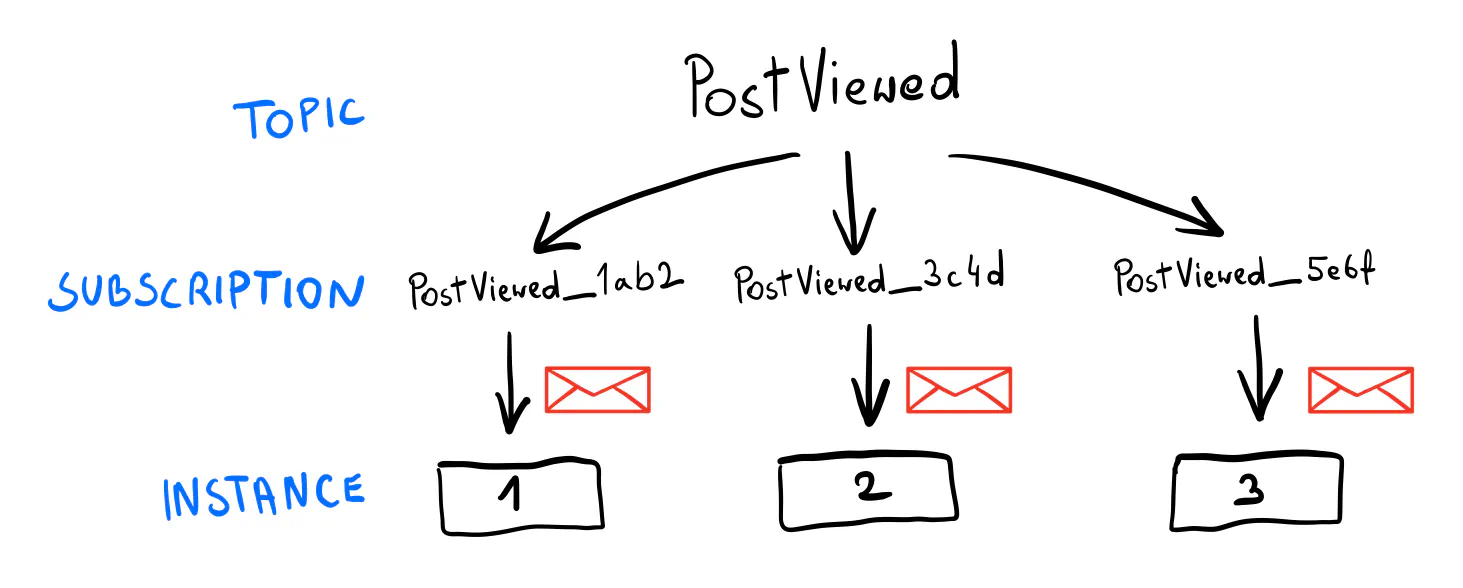
In Google Cloud Pub/Sub, you use a single “subscription” bound to a topic and share it among the replicas.
That’s why having a subscriber constructor is helpful in this context.
It allows us to specify what subscription to use for each event type.
In this example, the subscription joins the topic name with the handler name.
For example, PostViewed_UpdateViews.
As promised, with the setup done, adding message handlers is quite simple. Note that the functions are generic (with inferred types), so you work with strongly typed events! The handler name is used to generate the subscription name, so it needs to be unique within handlers.
err = eventProcessor.AddHandlers(
    cqrs.NewEventHandler(
        "UpdateViews",
        func(ctx context.Context, event *PostViewed) error {
            return repo.UpdatePost(ctx, event.PostID, func(post *Post) {
                post.Views++
            })
        },
    ),
    cqrs.NewEventHandler(
        "UpdateReactions",
        func(ctx context.Context, event *PostReactionAdded) error {
            return repo.UpdatePost(ctx, event.PostID, func(post *Post) {
                post.Reactions[event.ReactionID]++
            })
        },
    ),
)
Note
If you’re curious about the UpdatePost method, check Robert’s article on the repository pattern.
Tip
Be careful when refactoring
The names used for creating the topics and subscriptions are essential. If they were accidentally changed, you could lose messages.
You should not change the event or handler names once they’re running in production.
If you need to, consider creating a new event or handler.
For example, PostViewedV2.
The last part is running the router, just like you would run an HTTP server.
go func() {
    err := router.Run(context.Background())
    if err != nil {
        panic(err)
    }
}()
Note
To learn more about message routing, see the Consumer Groups Example.
Publishing PostStatsUpdated
We’ll use one more event to trigger the SSE updates: PostStatsUpdated.
It includes the post’s ID and a record of what has been updated (views or the reaction ID).
type PostStatsUpdated struct {
    PostID          int     `json:"post_id"`
    ViewsUpdated    bool    `json:"views_updated"`
    ReactionUpdated *string `json:"reaction_updated"`
}
Note
Since the release of this post, I realized the naive approach of getting the post from the database
on each update doesn’t scale well (hundreds of SELECT queries on each update, depending on how many visitors we have).
I’ve updated the example so the PostStatsUpdated event includes all stats.
This way, the SSE endpoint doesn’t need to query the database at all, except for the initial call.
You can see how big was the impact on the database load.
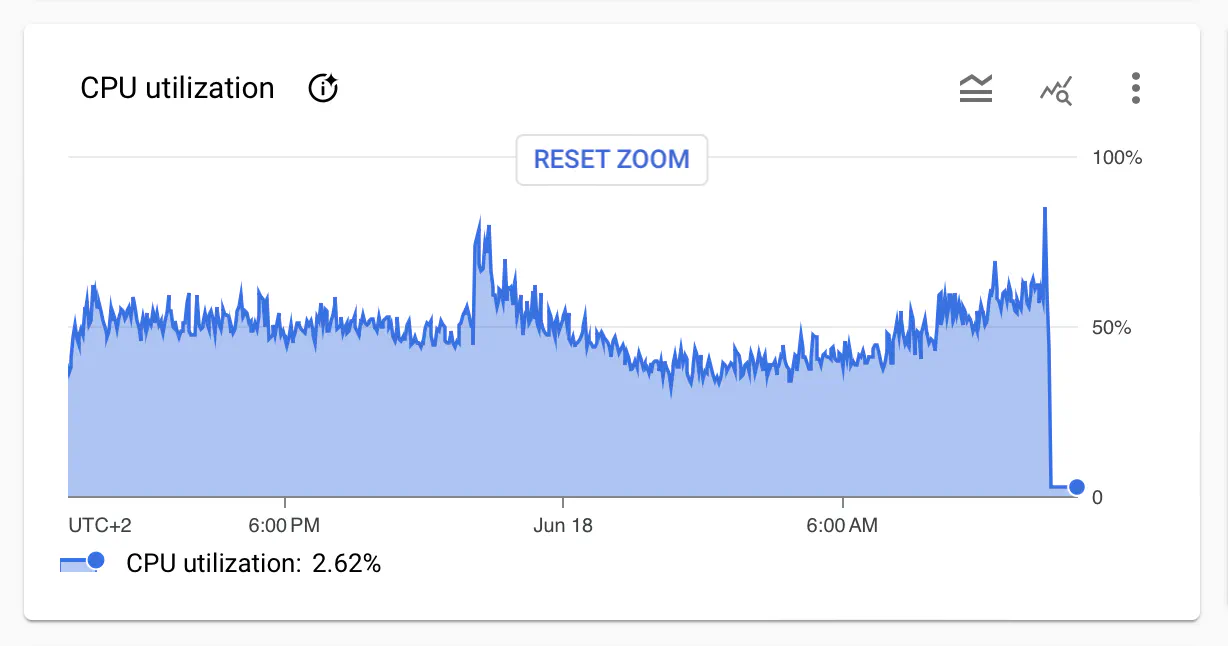
I left the original version in the code snippets for simplicity. You can see the changes on GitHub.
After updating the post, both handlers should publish the PostStatsUpdated event.
err = eventProcessor.AddHandlers(
    cqrs.NewEventHandler(
        "UpdateViews",
        func(ctx context.Context, event *PostViewed) error {
            err = repo.UpdatePost(ctx, event.PostID, func(post *Post) {
                post.Views++
            })
            if err != nil {
                return err
            }

            statsUpdated := PostStatsUpdated{
                PostID:       event.PostID,
                ViewsUpdated: true,
            }

            return eventBus.Publish(ctx, statsUpdated)
        },
    ),
    cqrs.NewEventHandler(
        "UpdateReactions",
        func(ctx context.Context, event *PostReactionAdded) error {
            err := repo.UpdatePost(ctx, event.PostID, func(post *Post) {
                post.Reactions[event.ReactionID]++
            })
            if err != nil {
                return err
            }

            statsUpdated := PostStatsUpdated{
                PostID:          event.PostID,
                ReactionUpdated: &event.ReactionID,
            }

            return eventBus.Publish(ctx, statsUpdated)
        },
    ),
)
SSE Router
It’s time to implement the SSE endpoints. Watermill also provides an SSE component that works well with other internals.
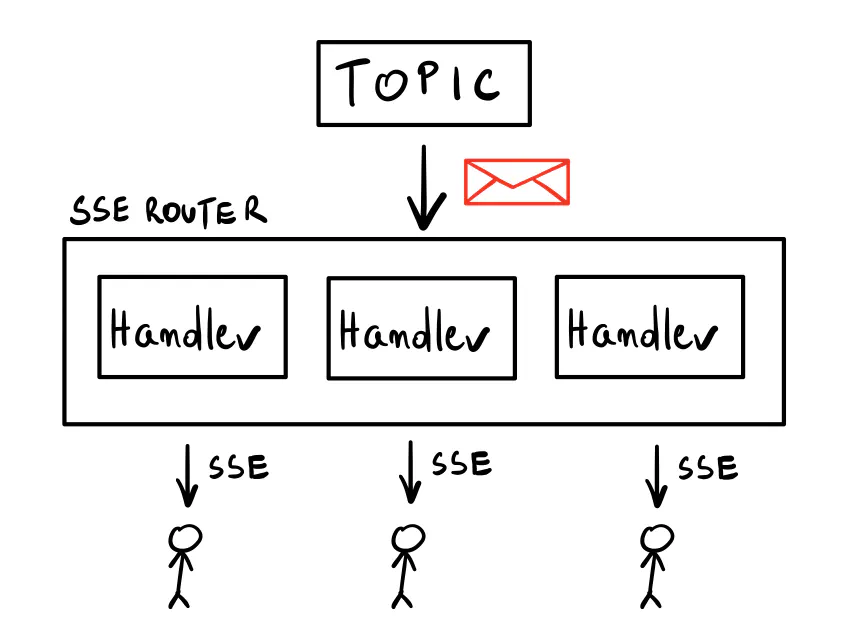
The main component is called SSE Router, and the idea behind it is pretty simple.
When you call its AddHandler method, it subscribes to the given topic in the configured subscriber.
The method returns a regular HTTP handler you can use with any HTTP router you want.
Whenever a message appears in the chosen topic, it will be propagated in a fan-out fashion to
all running SSE endpoints within.
First, let’s create the SSERouter
(it comes from the watermill-http package — use the v2 version!).
The config requires an UpstreamSubscriber: you need to subscribe to a Pub/Sub that contains the events.
We use Google Cloud Pub/Sub again.
I’ll explain the details of the configuration a bit later.
We use a string marshaler as we’re going to return plain HTML.
subscriber, err := googlecloud.NewSubscriber(googlecloud.SubscriberConfig{
	// ...
}, logger)
if err != nil {
	panic(err)
}

sseRouter, err := http.NewSSERouter(http.SSERouterConfig{
	UpstreamSubscriber: subscriber,
	Marshaler:          http.StringSSEMarshaler{},
}, logger)
if err != nil {
	panic(err)
}
Then, you need to implement the StreamAdapter interface:
type StreamAdapter interface {
	InitialStreamResponse(w http.ResponseWriter, r *http.Request) (response interface{}, ok bool)
	NextStreamResponse(r *http.Request, msg *message.Message) (response interface{}, ok bool)
}
These two methods are very similar.
The first one is how you respond to the initial HTTP request.
If needed, it lets you return an error and write it to the ResponseWriter.
This is important because as soon as you write any data, it’s too late to change the response code or the headers.
So, InitialStreamResponse is where you handle things like validation or authentication.
If any errors happen, return ok equal false to stop the handler.
Otherwise, what you return becomes the first event sent to the client.
NextStreamResponse is called for each incoming Message.
You can return a response to be sent to the SSE clients that use this endpoint.
Or you can skip the message (again, return ok equal false).
By default, whatever you return as the response is marshaled to JSON with event type data.
You can override this with a custom marshaler, as we did here.
You can also return the ServerSentEvent struct, which lets you explicitly specify the Event and Data fields.
In our case, InitialStreamResponse simply returns the post’s response.
func (s *statsStream) InitialStreamResponse(w http.ResponseWriter, r *http.Request) (response interface{}, ok bool) {
    postIDStr := r.PathValue("id")
    postID, err := strconv.Atoi(postIDStr)
    if err != nil {
        w.WriteHeader(http.StatusBadRequest)
        w.Write([]byte("invalid post ID"))
        return nil, false
    }

    resp, err := s.getResponse(r.Context(), postID, nil)
    if err != nil {
        w.WriteHeader(http.StatusInternalServerError)
        w.Write([]byte(err.Error()))
        return nil, false
    }

    return resp, true
}
NextStreamResponse is similar, but it also checks if the post’s ID in the event matches the one in the URL.
If not, it skips the message.
It means a post has been updated, but not the one this endpoint returns.
func (s *statsStream) NextStreamResponse(r *http.Request, msg *message.Message) (response interface{}, ok bool) {
    postIDStr := r.PathValue("id")
    postID, err := strconv.Atoi(postIDStr)
    if err != nil {
        fmt.Println("invalid post ID")
        return nil, false
    }

    var event PostStatsUpdated
    err = json.Unmarshal(msg.Payload, &event)
    if err != nil {
        fmt.Println("cannot unmarshal: " + err.Error())
        return "", false
    }

    if event.PostID != postID {
        return "", false
    }

    resp, err := s.getResponse(r.Context(), postID, &event)
    if err != nil {
        fmt.Println("could not get response: " + err.Error())
        return nil, false
    }

    return resp, true
}
As you can see, there’s no usual error handling here.
The best we can do is log the error and return false to skip the message.
The handler already replied with 200 OK, so it’s too late to change the status code.
Alternatively, we could return a custom response with the error message to be displayed to the user.
With the stream adapter ready, we can create a handler on the SSE Router:
statsHandler := sseRouter.AddHandler("PostStatsUpdated", &statsStream{repo: repo})
The first argument here is the topic to listen to.
The returned value is a ready-to-use http.HandlerFunc.
Most HTTP libraries and frameworks are compatible with net/http, so you can use it with whatever HTTP router you like.
I use echo, so there’s a small conversion of the path value needed:
e.GET("/posts/:id/stats", func(c echo.Context) error {
    postID := c.Param("id")
    c.Request().SetPathValue("id", postID)

    statsHandler(c.Response(), c.Request())
    return nil
})
Finally, you need to run the SSE router in a separate goroutine:
go func() {
    err := sseRouter.Run(context.Background())
    if err != nil {
        panic(err)
    }
}()
And that’s it! Whenever a message is published on the PostStatsUpdated topic, the SSE Router propagates it to all clients listening to the GET /posts/:id/stats endpoint.
The handlers created by the SSE Router already handle all implementation details, so you don’t need to worry about setting the headers.
When called without an Accept header or with a value other than text/event-stream, the handlers act as regular GET handlers,
returning the response from InitialStreamResponse.
Creating an EventStream in JavaScript automatically passes the header for you, but keep this in mind when debugging your endpoints with a tool like curl!
# Regular HTTP response
curl localhost:8080/posts/1/stats

# SSE response
curl -H "Accept: text/event-stream" localhost:8080/posts/1/stats
Configuring the Subscriber
Remember the part that we want each event to be processed only by one service replica at a time? In the case of events used for SSE, you need a counterintuitive approach: all subscribers need to process each event, as the SSE endpoints will be running across all of your service instances.
In other words, in this case, each replica should have its own subscription that’s not shared with anyone.
For Google Cloud Pub/Sub, an easy way to do it is to generate a unique subscription name on the service’s startup.
For example, using a “short UUID” would generate subscription names like PostStatsUpdated_lkcNowPZ99M123xPwqcxp1.
Keep in mind this can have some impact on your Pub/Sub. For example, when using Google Cloud Pub/Sub, it’s best to set the expiration policy for such subscriptions for one day, so they’re deleted when no longer used. There’s a hard limit of 10,000 subscriptions; you could quickly hit it this way.
subscriber, err := googlecloud.NewSubscriber(
    googlecloud.SubscriberConfig{
        ProjectID: cfg.PubSubProjectID,
        GenerateSubscriptionName: func(topic string) string {
            return fmt.Sprintf("%v_%v", topic, watermill.NewShortUUID())
        },
        SubscriptionConfig: pubsub.SubscriptionConfig{
            ExpirationPolicy: time.Hour * 24,
        },
    },
    logger,
)
If that sounds like a lot to consider, it’s because there is! Running production-grade Event-Driven systems comes with many advantages, but it’s not trivial. That’s why I go into detail here, so you know what to expect in production, not just in toy examples. (If that sounds like something you’d like to learn in-depth, see our Go Event-Driven training.)
htmx
The last piece of the puzzle is the client-side code.
In the example, we use htmx, a library that lets you make AJAX requests with HTML attributes. It also supports SSE with an extension. The templating in the snippets below comes from templ.
<div hx-ext="sse" sse-connect={ "/posts/" + post.ID + "/stats" } sse-swap="data"></div>
The sse-swap attribute is the event type to look for from the stream.
By default, Watermill’s SSE endpoints use data, so that’s what we use.
Every time an event is received from the /posts/:id/stats endpoint, its payload will be injected inside the div.
(Remember, our events are HTML.)
We also use htmx to send the reaction form asynchronously (a classic POST AJAX request).
In this case, we use hx-swap="outerHTML", which replaces the entire form with the response from the server.
It’s a button with a ✅ “check” suggesting that the reaction has been added.
The SSE will eventually update the stats.
(Although there might be a slight delay. If you care about UX, returning a “fake” number increase could make sense here.)
<form hx-post={ "/posts/" + postID + "/reactions"} hx-swap="outerHTML">
   <input type="hidden" name="reaction_id" value={ reaction.ID } />
   <button type="submit" class={"btn", "btn-outline-secondary", "m-1", templ.KV("animated", reaction.JustChanged)}>
      <span class="emoji">{ reaction.Label }</span>
      <span class="counter">{ reaction.Count }</span>
   </button>
</form>
Animations
If you’re used to working with Single Page Applications, using htmx might initially feel weird. For example, consider animating an element that has just been updated. In a classic SPA, you would get the JSON response from the SSE endpoint, compare the values with what’s in the “model”, and decide whether to animate the element.
While htmx allows for “hooks” after the request is done, it’s probably not what you want. Instead, you need to adjust your mental model a bit. The server code is the source of truth in this setup. There is no “client” that decides how to display things.
In this example, I use a CSS class to mark the updated element.
The class includes an animation that pops up the element for a moment.
The server code decides whether to add the class or not (based on the data in the incoming event).
(templ.KV is how you add a class conditionally using templ.
It will be present if stats.Views.JustChanged is true.)
<div class={ "d-flex", "align-items-center", templ.KV("animated", stats.Views.JustChanged)}>
    <span class="me-1">👁️</span>
    <small class="text-muted">{ stats.Views.Count + " views" }</small>
</div>
Other things to consider
Two kinds of SSE endpoints
How you return events from SSE endpoints is totally up to you. Here are two ways that make sense in different scenarios.
- An endpoint that returns the same data model initially and on every update. With each triggered update, you kind of “refresh” the model, perhaps embedded on the website. This is what we use in the example above.
- An endpoint that returns nothing initially and then keeps sending unique updates as they happen. You can append each new event to some list, for example. It’s how you would implement notifications or a web chat.
At-least-once delivery
When working with virtually any Pub/Sub, you must be aware of the “at-least-once” delivery guarantee. You may receive the same message twice because of network issues or your server going down at the wrong moment.
Don’t try to work around this. Instead, embrace that this can happen and design your handlers to be idempotent. It means that processing the message twice (or more) has the same effect as processing it once.
In the example above, we don’t guard against it. If the same message was processed twice, it would add an extra view or reaction in the database. It’s not a big deal in this case, and we can live with it. One way to prevent it would be to store the processed message IDs in the database and check it on each update.
Watch out for HTTP/1.1
In modern browsers, there’s a limit of 6 open connections per server over HTTP/1.1, which can be a big issue when using SSE. Your website won’t work well if someone opens it in several tabs.
For best results, use SSE with HTTP/2 where this limit doesn’t apply. Most modern web servers support HTTP/2, so make sure you enable it.
Local environment tricks
Here are two tips unrelated to SSE that might be useful for running your app locally.
Mounting /go/pkg and go cache
In the docker-compose definition, you can mount the /go/pkg and /go-cache directories to speed up the build process.
This way, you don’t have to download the dependencies whenever you rebuild the container.
services:
  server:
    # ...
    volumes:
      - go_pkg:/go/pkg
      - go_cache:/go-cache

volumes:
  go_pkg:
  go_cache:
Reflex for regenerating templ and rebuilding the server
Reflex is my go-to tool for live code reloading. (See my post on the dev environment setup.) When working with templ, you can use a configuration like the one below to regenerate the templates and rebuild the server after every change.
It’s a great way to speed up your development process, so you don’t need to keep switching between code, the terminal, and the browser.
-r '(\.go$|go\.mod$)' -s go run .
-r '\.templ$' templ generate
Go build something!
That should be all the theory you need to build something cool. If you have any questions, let me know in the comments.
Once again, the complete source code is on GitHub
You can run it locally with docker-compose up.
Give this stack a try; I had lots of fun working with it. Good luck!