
We intentionally built the current version of the application to make it hard to maintain and develop in the future. In a subtle way. 😉 In the next article we will start the refactoring process. We will show you how subtle issues and shortcuts can become an issue in the long term. Even adding a new feature now may not be as easy, as developing greenfield features (even if the application is still pretty new).
But before that, we have one important topic to cover – authentication. This is the part of the application that will not need refactoring. 😉
You shouldn’t reinvent the wheel
(I hope that) you are not creating a programming language, and a framework for every project you work on. Even if you do that, besides losing a lot of time, it is not harmful. That case is not the same for authentication. Why?
Let’s imagine that you are working in a company implementing a cryptocurrency market. At the beginning of the project, you decided to build your own authentication mechanism. The first reason for that is your boss, who doesn’t trust external authentication providers. The second reason is that you believe that it should be simple.
“You did it many times” – this is what strange voices in your head repeat every time.
Have you seen the Mayday / Air Crash Investigation documentary TV series? In the Polish edition, every episode starts with more or less: “Catastrophes are not a matter of coincidence, but series of unfortunate events”. In programming, this sentence is surprisingly true.
In our hypothetical project, in the beginning, your company decided to introduce a service account that was able to move funds between every account. Even from a wallet that, in theory, should be offline. Of course, temporarily. 😆 That doesn’t sound like a good idea, but it simplified customer support from the very beginning.
With time everyone forgot about this feature. Until one day, when hackers found a bug in the authentication mechanism, that allowed them to hijack any account in our market. Including the service account.
Our boss and coworkers were less happy than hackers because they lost all the money. The problem would be not so big if we would lose “only” all company’s money. In that case, we also lost all our customers' money 😉.

This example may sound a bit extreme and unlikely to happen. Is it a rare scenario? OWASP Top Ten report lists Broken Authentication at second place!
- Broken Authentication. Application functions related to authentication and session management are often implemented incorrectly, allowing attackers to compromise passwords, keys, or session tokens, or to exploit other implementation flaws to assume other users’ identities temporarily or permanently.
You may say: “My company is just selling toasters! Why should I care?". I’m pretty sure that you still care about your company’s image. Discreditation after an incident caused by hackers hijacking your customers' accounts is always embarrassing.
Do you still feel that you can implement a perfect authentication? Even giants with hundreds of researchers and developers working just on authentication are not able to do that. In March 2020, a researcher found a Facebook vulnerability that could allow hijacking anyone’s Facebook account. Just a few months later, a bug in Apple Sign In mechanism allowed full account takeover of user accounts on that third party application.
If you are still not convinced, it’s worth to consider saving your time. I’m sure customers of your company will be much happier about giving them a long-awaited feature. Not fancy, custom authentication 😉.
Using Firebase authentication
There are, many solutions that can be used for implementing authentication.
The Wild Workouts example application that we created for this article series is now hosted on Firebase hosting. We will use Authentication provided by Firebase. There is one significant advantage of this solution – it works almost totally out of the box both from the backend and frontend side. We are also not considering any vendor lock-in problems – we will address that in the future 😉.
Frontend
The first thing that we need to do is the initialization of Firebase SDK.
Next, in the form on the main page, we call the loginUser function.
This function calls Auth.login, Auth.waitForAuthReady and Auth.getJwtToken.
The result is set to OpenAPI generated clients by setApiClientsAuth.
// ...
export function loginUser(login, password) {
    return Auth.login(login, password)
        .then(function () {
            return Auth.waitForAuthReady()
        })
        .then(function () {
            return Auth.getJwtToken(false)
        })
        .then(token => {
            setApiClientsAuth(token)
        })
// ...
Auth is a class with two implementations: Firebase and mock.
We will go through mock implementation later – let’s focus on Firebase now.
To log-in we need to call firebase.auth().signInWithEmailAndPassword. If everything is fine, auth().currentUser.getIdToken returns our JWT token.
class FirebaseAuth {
    login(login, password) {
        return firebase.auth().signInWithEmailAndPassword(login, password)
    }

    waitForAuthReady() {
        return new Promise((resolve) => {
            firebase
                .auth()
                .onAuthStateChanged(function () {
                    resolve()
                });
        })
    }

    getJwtToken(required) {
        return new Promise((resolve, reject) => {
            if (!firebase.auth().currentUser) {
                if (required) {
                    reject('no user found')
                } else {
                    resolve(null)
                }
                return
            }

            firebase.auth().currentUser.getIdToken(false)
                .then(function (idToken) {
                    resolve(idToken)
                })
                .catch(function (error) {
                    reject(error)
                });
        })
    }
Next, we need to set authentications['bearerAuth'].accessToken of OpenAPI generated clients attribute to the JWT token received from Auth.getJwtToken(false).
Now we need to set this token to OpenAPI clients and voilà! All our requests are now authenticated.
export function setApiClientsAuth(idToken) {
    usersClient.authentications['bearerAuth'].accessToken = idToken
    trainerClient.authentications['bearerAuth'].accessToken = idToken
    trainingsClient.authentications['bearerAuth'].accessToken = idToken
}
If you would like to know more, I would recommend you to check Firebase Auth API reference.
Backend
The last part is actually using this authentication in our HTTP server. I created a simple HTTP middleware that will do that task for us.
This middleware does three things:
- Get token from HTTP header
- Verify token with Firebase auth client
- Save user data in credentials
package auth

import (
   "context"
   "net/http"
   "strings"

   "firebase.google.com/go/auth"
   "github.com/pkg/errors"
   "github.com/ThreeDotsLabs/wild-workouts-go-ddd-example/pkg/internal/server/httperr"
)

type FirebaseHttpMiddleware struct {
   AuthClient *auth.Client
}

func (a FirebaseHttpMiddleware) Middleware(next http.Handler) http.Handler {
   return http.HandlerFunc(func(w http.ResponseWriter, r *http.Request) {
      ctx := r.Context()

      bearerToken := a.tokenFromHeader(r)
      if bearerToken == "" {
         httperr.Unauthorised("empty-bearer-token", nil, w, r)
         return
      }

      token, err := a.AuthClient.VerifyIDToken(ctx, bearerToken)
      if err != nil {
         httperr.Unauthorised("unable-to-verify-jwt", err, w, r)
         return
      }

      // it's always a good idea to use custom type as context value (in this case ctxKey)
      // because nobody from the outside of the package will be able to override/read this value
      ctx = context.WithValue(ctx, userContextKey, User{
         UUID:        token.UID,
         Email:       token.Claims["email"].(string),
         Role:        token.Claims["role"].(string),
         DisplayName: token.Claims["name"].(string),
      })
      r = r.WithContext(ctx)

      next.ServeHTTP(w, r)
   })
}

type ctxKey int

const (
   userContextKey ctxKey = iota
)

// ...

func UserFromCtx(ctx context.Context) (User, error) {
   u, ok := ctx.Value(userContextKey).(User)
   if ok {
      return u, nil
   }

   return User{}, NoUserInContextError
}
User data can now be accessed in every HTTP request by using auth.UserFromCtx function.
func (h HttpServer) GetTrainings(w http.ResponseWriter, r *http.Request) {
   user, err := auth.UserFromCtx(r.Context())
   if err != nil {
      httperr.Unauthorised("no-user-found", err, w, r)
      return
   }

    // ...
We can also limit access to some resources, based on the user role.
func (h HttpServer) MakeHourAvailable(w http.ResponseWriter, r *http.Request) {
   user, err := auth.UserFromCtx(r.Context())
   if err != nil {
      httperr.Unauthorised("no-user-found", err, w, r)
      return
   }

   if user.Role != "trainer" {
      httperr.Unauthorised("invalid-role", nil, w, r)
      return
   }
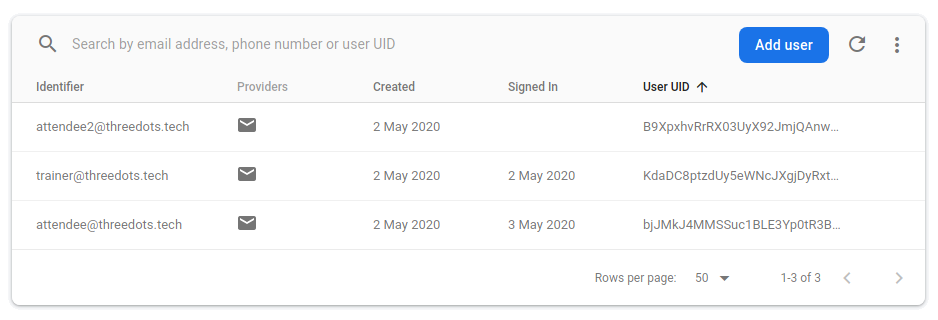
Adding users
In our case, we add users during the start of the users service. You can also add them from the FirebaseUI.
Unfortunately, via UI you cannot set all required data, like claims – you need to do it via API.
config := &firebase.Config{ProjectID: os.Getenv("GCP_PROJECT")}
firebaseApp, err := firebase.NewApp(context.Background(), config, opts...)
if err != nil {
    return nil, err
}

authClient, err := firebaseApp.Auth(context.Background())
if err != nil {
    return nil, err
}

// ...

for _, user := range usersToCreate {
    userToCreate := (&auth.UserToCreate{}).
        Email(user.Email).
        Password("123456").
        DisplayName(user.DisplayName)

    createdUser, err := authClient.CreateUser(context.Background(), userToCreate)

    // ...

    err = authClient.SetCustomUserClaims(context.Background(), createdUser.UID, map[string]interface{}{
        "role": user.Role,
    })

    // ...
Mock Authentication for local dev
There is high demand and a discission going around support for Firebase Authentication emulator. Unfortunately, it doesn’t exist yet. The situation is pretty similar to Firestore here – I want to be able to run my application locally without any external dependencies. As long as there is no emulator, there is no other way than to implement a simple mock implementation.
There is nothing really complicated in both backend and frontend implementation.
Frontend’s getJwtToken is implemented by just generating JWT token with mock secret.
Backend instead of calling Firebase to verify the token is checking if JWT was generated with mock secret.
It gives us some confidence if our flow is implemented more or less correctly. But is there any option to test it with production Firebase locally?
Firebase Authentication for local dev
Mock authentication does not give us 100% confidence that the flow is working correctly. We should be able to test Firebase Authentication locally. To do that, you need to do some extra steps.
It is not straightforward. If you are not changing anything in the authentication, you can probably skip this part.
First of all, you need to generate a service account file into the repository.
gcloud auth login

gcloud iam service-accounts keys create service-account-file.json --project [YOUR PROJECT ID] --iam-account [YOUR PROJECT ID]@appspot.gserviceaccount.com
Next, you need to uncomment all lines linking service account in docker-compose.yml
     volumes:
       - ./pkg:/pkg
-#      - ./service-account-file.json:$SERVICE_ACCOUNT_FILE
+      - ./service-account-file.json:$SERVICE_ACCOUNT_FILE
     working_dir: /pkg/trainer
     ports:
       - "127.0.0.1:3000:$PORT"

       context: ./dev/docker/app
     volumes:
       - ./pkg:/pkg
-#      - ./service-account-file.json:$SERVICE_ACCOUNT_FILE
+      - ./service-account-file.json:$SERVICE_ACCOUNT_FILE
     working_dir: /pkg/trainer

@ ... do it for all services!
After that, you should set GCP_PROJECT to your project id, uncomment SERIVCE_ACCOUNT_FILE and set MOCK_AUTH to false in .env
-GCP_PROJECT=threedotslabs-cloudnative
+GCP_PROJECT=YOUR-PROJECT-ID

 PORT=3000

-FIRESTORE_PROJECT_ID=threedotslabs-cloudnative
+FIRESTORE_PROJECT_ID=YOUR-PROJECT-ID
 FIRESTORE_EMULATOR_HOST=firestore:8787
 # env used by karhoo/firestore-emulator container
-GCP_PROJECT_ID=threedotslabs-cloudnative
+GCP_PROJECT_ID=YOUR-PROJECT-ID

 TRAINER_GRPC_ADDR=trainer-grpc:3000
 USERS_GRPC_ADDR=users-grpc:3000

@ ...

 CORS_ALLOWED_ORIGINS=http://localhost:8080

-#SERVICE_ACCOUNT_FILE=/service-account-file.json
-MOCK_AUTH=true
+SERVICE_ACCOUNT_FILE=/service-account-file.json
+MOCK_AUTH=false
 LOCAL_ENV=true
-const MOCK_AUTH = process.env.NODE_ENV === 'development'
+const MOCK_AUTH = false
Now you need to go to Project Settings (you can find it after clicking the gear icon right to Project overview) and update your Firebase settings in web/public/__/firebase/init.json.
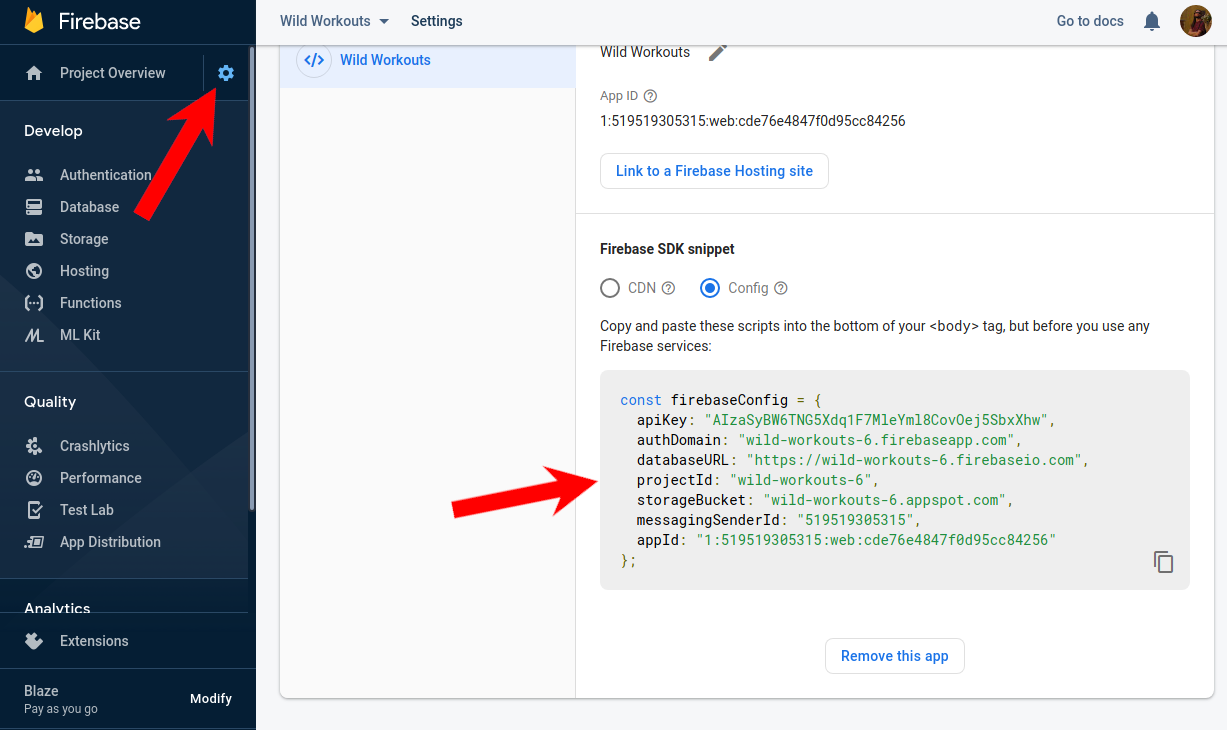
-  "apiKey": "",
-  "appId": "",
-  "authDomain": "",
-  "databaseURL": "",
-  "messagingSenderId": "",
-  "projectId": "",
-  "storageBucket": ""
+  "apiKey": "AIzaSyBW6TNG5Xdq1F7MleYml8CovOej5SbxXhw",
+  "authDomain": "wild-workouts-6.firebaseapp.com",
+  "databaseURL": "https://wild-workouts-6.firebaseio.com",
+  "projectId": "wild-workouts-6",
+  "storageBucket": "wild-workouts-6.appspot.com",
+  "messagingSenderId": "519519305315",
+  "appId": "1:519519305315:web:cde76e4847f0d95cc84256"
 }
The last thing is stopping and starting again docker-compose to reload envs and links.
And that’s all
As you can see, the setup was really straightforward. We were able to save a lot of our time. The situation could be more complicated if we wouldn’t like to host our application on Firebase. Our idea from the beginning was to prepare a simple base for future articles.
We didn’t exhaust the topic of authentication in this article. But at least for now, we don’t plan to explore authentication deeper.
Maybe you have some good or bad experiences with any authentication solution in Go? Please share in the comments, so all readers can profit from that! 👍In this series we would like to show you how to build applications that are easy to develop, maintain, and fun to work with in the long term. Maybe you’ve seen examples of Domain-Driven Design or Clean Architecture in Go. Most of them are not done in a really pragmatic way that works in the language context.
In following articles, we will show patterns that we successfully use in teams that we lead for a couple years. We will also show when applying them makes sense, and when it’s over-engineering or CV-Driven Development. I’m sure that it will force you to rethink your point of view for these techniques. 😉
That’s all for today. The next article will be available in 1-2 weeks. Please join our newsletter, if you don’t want to miss that! 😉