GitLab CI tips for building custom workflows
This time I’d like to touch on a few more advanced topics related to GitLab CI. The common theme here is implementing custom features within your pipeline. Again, most of the tips are specific to GitLab, but some could be easily applied in other CI systems as well.
Running integration tests
Checking your code with unit tests is usually easy to plug into any CI system. It usually is as simple as running one command built in your language’s toolset. In these tests, you will most likely use various mocks and stubs to hide implementation details and focus on testing particular logic. For example, you can use in-memory database as storage or write stub HTTP clients that always return some prepared payloads.
However, eventually, you will need to run integration tests to cover more unusual test cases. I don’t want to start a discussion on all possible test types here, so let me say this: by integration tests I mean tests that use some sort of external resource. This can be a real database server, an HTTP service, attachable storage, and so on.
GitLab makes it trivial to run attached resources as Docker containers, linked with the container
running your scripts. You can use the services
keyword to define these dependencies. They will be accessible by their image name or your chosen
name if you specify it in the alias field.
This is a simple example of using an attached MySQL container:
integration_tests:
  stage: tests
  services:
    - name: mysql:8
      alias: db
  script:
    - ./run_tests.sh db:3306
In that case, you have to connect to the db hostname in your test scripts. Using an alias is
usually a good idea, as you can switch the images without changing the test code. For example, you
could change mysql image with mariadb and the script would still run correctly.
Note
Waiting for containers
Because attached containers can take a while to warm up, you will probably need to wait before sending any requests. A simple way to do this is by using wait-for-it.sh script with a specified timeout.
Using Docker Compose
Using services should be good enough for most of your use cases. However, sometimes you need
the external services to communicate with each other. One example may be running Kafka and ZooKeeper
in two separate containers (the official images are built this way). Another is running
tests with a dynamic number of nodes, like selenium. For running services like this, a better
solution is to use Docker Compose.
version: '3'
services:
  zookeeper:
    image: confluentinc/cp-zookeeper
    environment:
      ZOOKEEPER_CLIENT_PORT: 2181

  kafka:
    image: confluentinc/cp-kafka
    environment:
      KAFKA_ZOOKEEPER_CONNECT: zookeeper:2181
      KAFKA_ADVERTISED_LISTENERS: PLAINTEXT://kafka:9092
    ports:
      - 9092:9092
If you’re running your own GitLab runners on a trusted server, you can use
Shell executor to run Docker Compose.
Another option may be using Docker in Docker (dind) container.
Read this first, though.
One way of using Compose is to set up the environment, run tests and tear it down. A simple bash script would look like this:
docker-compose up -d
./run_tests.sh localhost:9092
docker-compose down
This solution is fine as long as your tests can run in a minimal environment. It may happen though, that you will need some dependencies installed. There is another way of running tests in Docker Compose that lets you built your own docker image with the test environment. You make one of the containers run the tests and exit with proper code.
version: '3'
services:
  zookeeper:
    image: confluentinc/cp-zookeeper
    environment:
      ZOOKEEPER_CLIENT_PORT: 2181

  kafka:
    image: confluentinc/cp-kafka
    environment:
      KAFKA_ZOOKEEPER_CONNECT: zookeeper:2181
      KAFKA_ADVERTISED_LISTENERS: PLAINTEXT://kafka:9092

  tests:
    image: registry.example.com/some-image
    command: ./run_tests.sh kafka:9092
Notice that we got rid of the ports mapping. In this example, tests can communicate directly with
all services.
Tests can now be executed with a single command:
docker-compose up --exit-code-from tests
The --exit-code-from option implies --abort-on-container-exit, which means the whole
environment started by docker-compose up will be stopped after one of the containers exits.
The exit code of that command will be equal to the exit code of the chosen service (tests
in the example above). So if the command running your tests exits with a non-zero code,
the whole docker-compose up command will exit with this code.
Using labels as CI tags
A word of warning: this is rather an unusual idea, but one I’ve found very useful and flexible. As you probably know, GitLab has Labels feature on project and group levels. Labels can be attached to issues and merge requests. They have no relation to the pipelines, though.
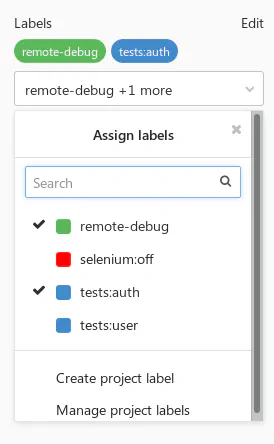
With a bit of hacking, you can access the merge request labels in the job scripts.
As of GitLab 11.6, this is now even easier, as there is a CI_MERGE_REQUEST_IID environment variable
(yes, it’s IID, not ID) available if your pipeline is using only: merge_requests.
Note
If you’re not using only: merge_requests or running an older version of GitLab, you can still get the MR with an API call.
curl "$CI_API_V4_URL/projects/$CI_PROJECT_ID/repository/commits/$CI_COMMIT_SHA/merge_requests?private_token=$GITLAB_TOKEN"
iid is the field you’re after. Just be aware that this could return multiple MRs for a given commit.
When you get the MR IID, all that’s left is to call the Merge Requests API
and use the labels field from the response.
curl "$CI_API_V4_URL/projects/$CI_PROJECT_ID/merge_requests/$CI_MERGE_REQUEST_IID?private_token=$GITLAB_TOKEN"
Authorization
Sadly, using $CI_JOB_TOKEN to access project’s API is not possible at the moment (at least unless the project is public).
If your project has restricted access (internal or private), you will need to generate
a personal API token to authorize with the GitLab API.
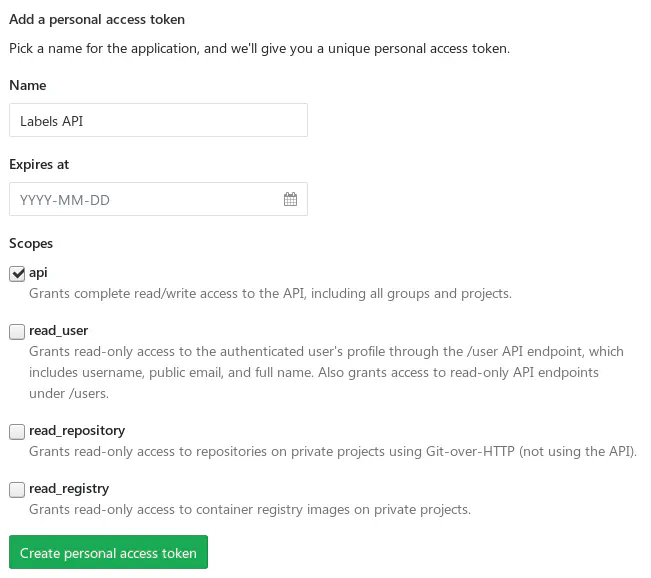
This is not the most secure solution, though, so be careful. If this token would be leaked, someone could gain write access to all of your projects. One way of reducing the risk is to create a separate account with read-only access to the repository and generate a personal token for this account.
Note
How safe are your variables?
A few versions ago, the Variables section has been called Secret Variables, which could sound like they were designed to store credentials and sensitive data safe. Frankly, the variables are just hidden from users who don’t have Maintainer permissions. They are not encrypted on disk and can be easily leaked as environment variables in your scripts.
Keep it in mind when adding any variables and consider storing your secrets in safer solutions (e.g. HashiCorp’s Vault).
Use cases
It’s now up to you to decide what to do with the list of labels. Some ideas:
- Use it for tests segmentation.
- Introduce key-value semantics with a colon (e.g. labels like
tests:auth,tests:user) - Enable some specific features for jobs.
- Allow debugging of specific jobs when a label is present.
Calling external APIs
While GitLab comes with a suite of included features, it’s very likely you still use other tools
that could be integrated with your pipelines. The simplest way to do it is of course by good old curl calls.
If you’re writing your own tools, you could also have it listen to GitLab’s Webhooks (look up the Integrations tab in the project’s settings). If you’d use it with some critical systems though, make sure they are highly-available.
Example: Grafana annotations
If you’re using Grafana, annotations are a nice way of marking on graphs an event that happened in time. While it’s possible to add them by clicking in the GUI, they can also be added by the Grafana REST API.
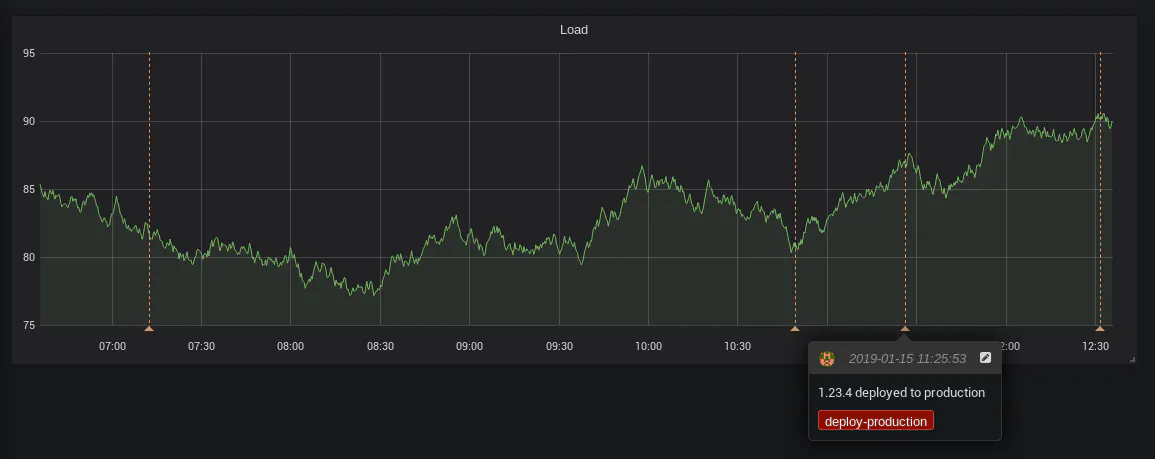
You will need to generate an API Key to access the API. Consider creating a dedicated user with restricted access.

Set two variables in your project settings:
GRAFANA_URL- the URL of your Grafana instance (e.g.https://grafana.example.com)GRAFANA_APIKEY- the generated API Key
To keep it re-usable, you can put the script in the common scripts repository:
#!/bin/bash
set -e

if [ $# -lt 2 ]; then
    echo "Usage: $0 <text> <tag>"
    exit 1
fi

readonly text="$1"
readonly tag="$2"
readonly time="$(date +%s)000"

cat >./payload.json <<EOF
{
    "text": "$text",
    "tags": ["$tag"],
    "time": $time,
    "timeEnd": $time
}
EOF

curl -X POST "$GRAFANA_URL/api/annotations" \
     -H "Authorization: Bearer $GRAFANA_APIKEY" \
     -H "content-type: application/json" \
     -d @./payload.json
Now call it with proper parameters in the CI definition:
deploy:
    stage: deploy
    script:
      - $SCRIPTS_DIR/deploy.sh production
      - $SCRIPTS_DIR/grafana-annotation.sh "$VERSION deployed to production" deploy-production
You could also put it in the deploy.sh script to keep the CI definition even simpler.
Bonus quick tips
GitLab has a great documentation on all possible keywords in the CI definition. I don’t want to duplicate the content here, but I’d like to point out a few useful use cases. Click on the headers to view the docs.
Advanced only/except usage
Use pattern matching on variables to enable custom builds for some of the branches. You don’t want to overuse it, but if you quickly need to push a hotfix, this might help.
only:
  refs:
    - branches
  variables:
    - $CI_COMMIT_REF_NAME =~ /^hotfix/
GitLab includes a lot of predefined variables in each CI job, make use of them.
YAML anchors
Use them to avoid duplication.
Since 11.3 you can also use the extends keyword.
.common_before_script: &common_before_script
  before_script:
    - ...
    - ...

deploy:
  <<: *common_before_script
Skipping dependencies
By default, all artifacts built in the pipeline will be passed to all following jobs. You can save some time and disk space by explicitly listing artifacts the jobs depends on:
dependencies:
  - build
Alternatively, skip them entirely if none are required:
dependencies: []
Git strategy
Skip cloning the repository if the job won’t use its files.
variables:
  GIT_STRATEGY: none
That’s it!
Thanks for reading! Hit me up with feedback or questions on Twitter or Reddit.
For more GitLab tips, check out my previous posts:

