Making Games in Go: Entity Component System (ECS)

I started my last post on making games by saying gamedev is a great hobby for when you don’t do as much coding day-to-day. A few years later, many of us see even less code, so it feels like a good time to give it another shot. This time I talk about ECS, a data-oriented way to structure games. I show it on a small game you can play right in this post.
But first, the elephant in the room: Don’t AI agents one-shot full games now?
Sure. Why would that stop you from learning something new?
Just for fun, focus on the process instead of the outcome. Make a game your way. It’ll make you want to scream “LOOK WHAT I HAVE CREATED!” like Tom Hanks in Cast Away. (Note: there’s no audience in that scene, which is very accurate.)

I find making games fun for at least two reasons:
- Typing the code to make stuff on the screen do what you want it to.
- Making a world you pictured in your mind come to life and interacting with it.
Using AI takes the fun out of tinkering with the code (reason #1). But it lets you see the results quicker and try bigger projects (reason #2). There’s no wrong way to have fun, so pick whatever fits your mood.
Even if you use AI, it’s still worth learning the foundations. I found it easier to steer agents when they work on a project where I had already put the scaffolding in place. They’re much better at imitation than coming up with something new. (I share the patterns I give agents at the end.)
Learning software concepts isn’t only about the code. It also changes how you think about projects. You know what systems are in place, how the elements interact, and what a good solution would be. I care more than ever about keeping my mental models sharp now that AI can produce infinite output that’s worthless unless someone decides otherwise.
Note
The usual disclaimer: I’m a hobbyist making tiny 2D games. I do it for fun, and have never shipped a professional game. I write about what has worked for me, and it could be something dumb. (If that’s the case, let me know in the comments!)
Why bother with ECS?
Previously, I described a simple approach to working with game objects. Each object is a struct and has its own Update() and Draw() methods. In the game loop, we iterate over all the objects and call their methods.
type Player struct {
	Position Vector
	Sprite   *ebiten.Image
}

func NewPlayer() *Player {
	return &Player{
		Position: Vector{
			X: 100,
			Y: 100,
		},
		Sprite:   PlayerSprite,
	}
}

func (p *Player) Update() {
	p.Position.X += 10
}

func (p *Player) Draw(screen *ebiten.Image) {
	op := &ebiten.DrawImageOptions{}
	op.GeoM.Translate(p.Position.X, p.Position.Y)
	screen.DrawImage(p.Sprite, op)
}
This is a good start. It’s easy to follow how the game works and to add new objects. But as the game becomes more complex, it gets messy. The Update methods get long. You need to pass many references around, because objects don’t know about other objects. Some logic doesn’t clearly belong to any one object.
Another challenge in many games is that objects have similar traits, but aren’t quite the same thing. For example, a player character, an NPC, and an enemy are very similar objects, but also completely different gameplay-wise. They all have health points, move in the game world, collide with the terrain, and so on. But one is controlled by the player, one you can talk to to accept a quest, and one attacks you on sight.
One way to approach this is with some kind of inheritance (or embedding in Go). You create a basic Object with all common traits, then extend it with more specific entities.
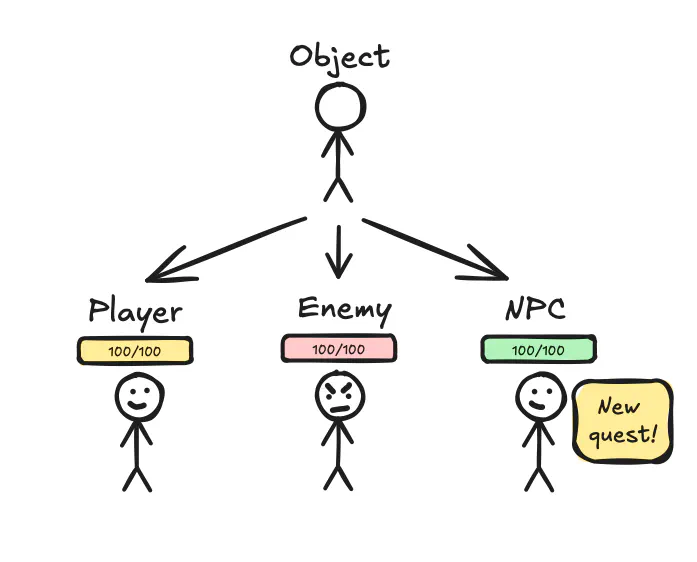
But what if you want an NPC to turn hostile after an interaction? Or if you want the player to sometimes talk to the enemy? Or if you want to briefly take control over any of them? The inheritance model stops working, and you need workarounds that can get ugly.
I’ve been trying to figure this out, and I discovered the Entity Component System (ECS) architecture. It became my go-to approach for making games. I’m using the Donburi ECS library in Go together with the Ebitengine 2D game engine. Both are super fun to work with.
You may see ECS mentioned for performance reasons (storing components of one type together in memory makes iterating over them fast), but for me, the best part is the mental model shift. You split the game into small building blocks with clear responsibilities, so it’s easier to think about how it works. Keeping the data separate from the behavior is also an interesting idea that can help you approach other software projects.
Entities, components, and systems
Note
If you want to follow along, I recommend reading the previous post first, where I explain the basics of Ebitengine.
In ECS, you split your game into three parts:
- Entities: generic “objects” that appear in your game. They have no behavior on their own, no dedicated structs, and no
UpdateorDrawmethods. An entity on its own is essentially an ID. It’s a unique thing that exists in the game. - Components: plain data structs that you’ll attach to the entities. They describe whatever attributes the entity has. For example: position, health points, velocity, etc. They’re like building blocks that make up each entity.
- Systems: the actual game logic.
Updateloops that do something with the entities with specific components on them.
It’s like an extreme take on the Single Responsibility Principle. You clearly separate identity, data, and behavior in the code.
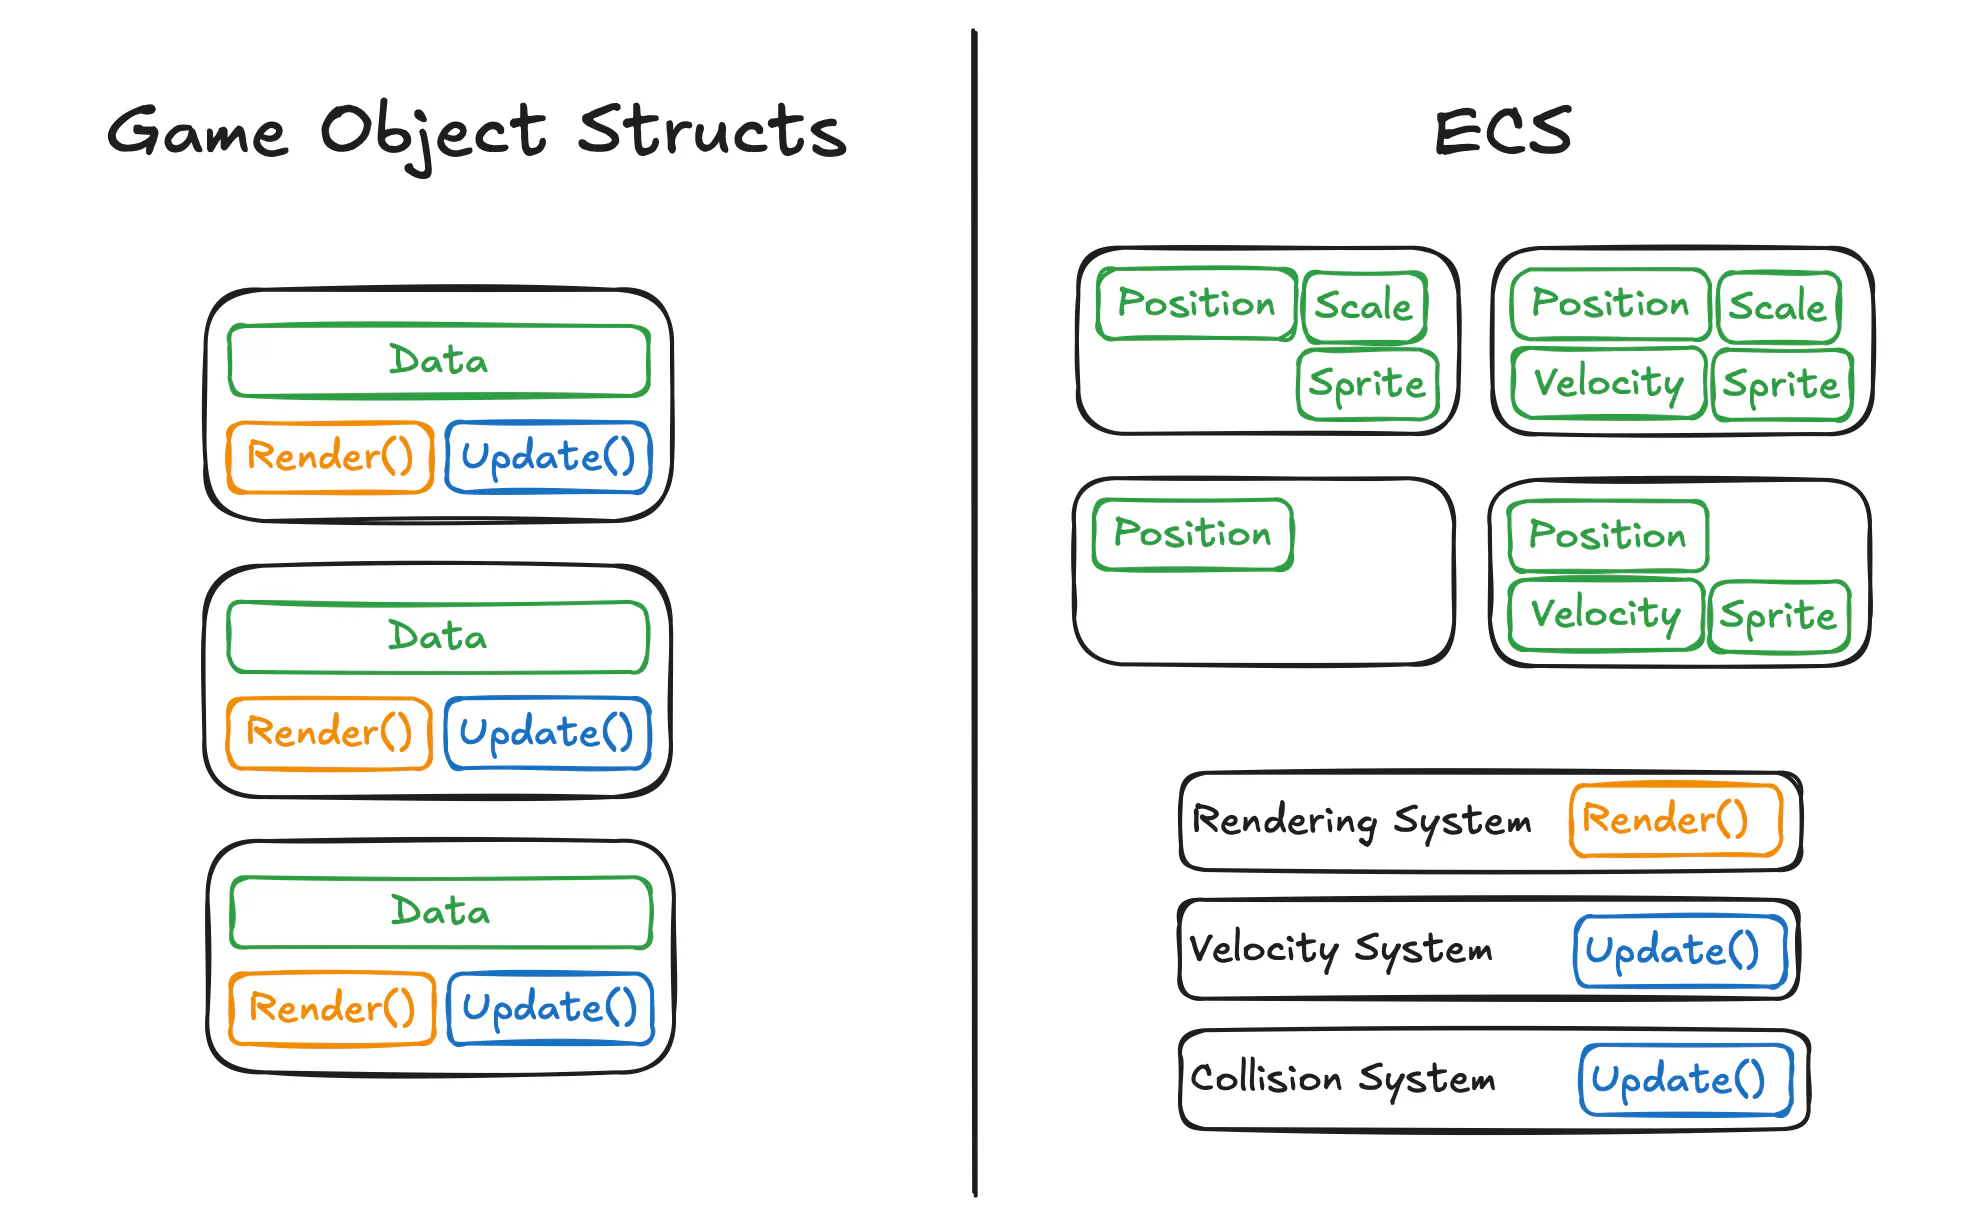
Let’s consider a trivial example to see how it works. We’ll display a grid of colorful tiles on the screen.
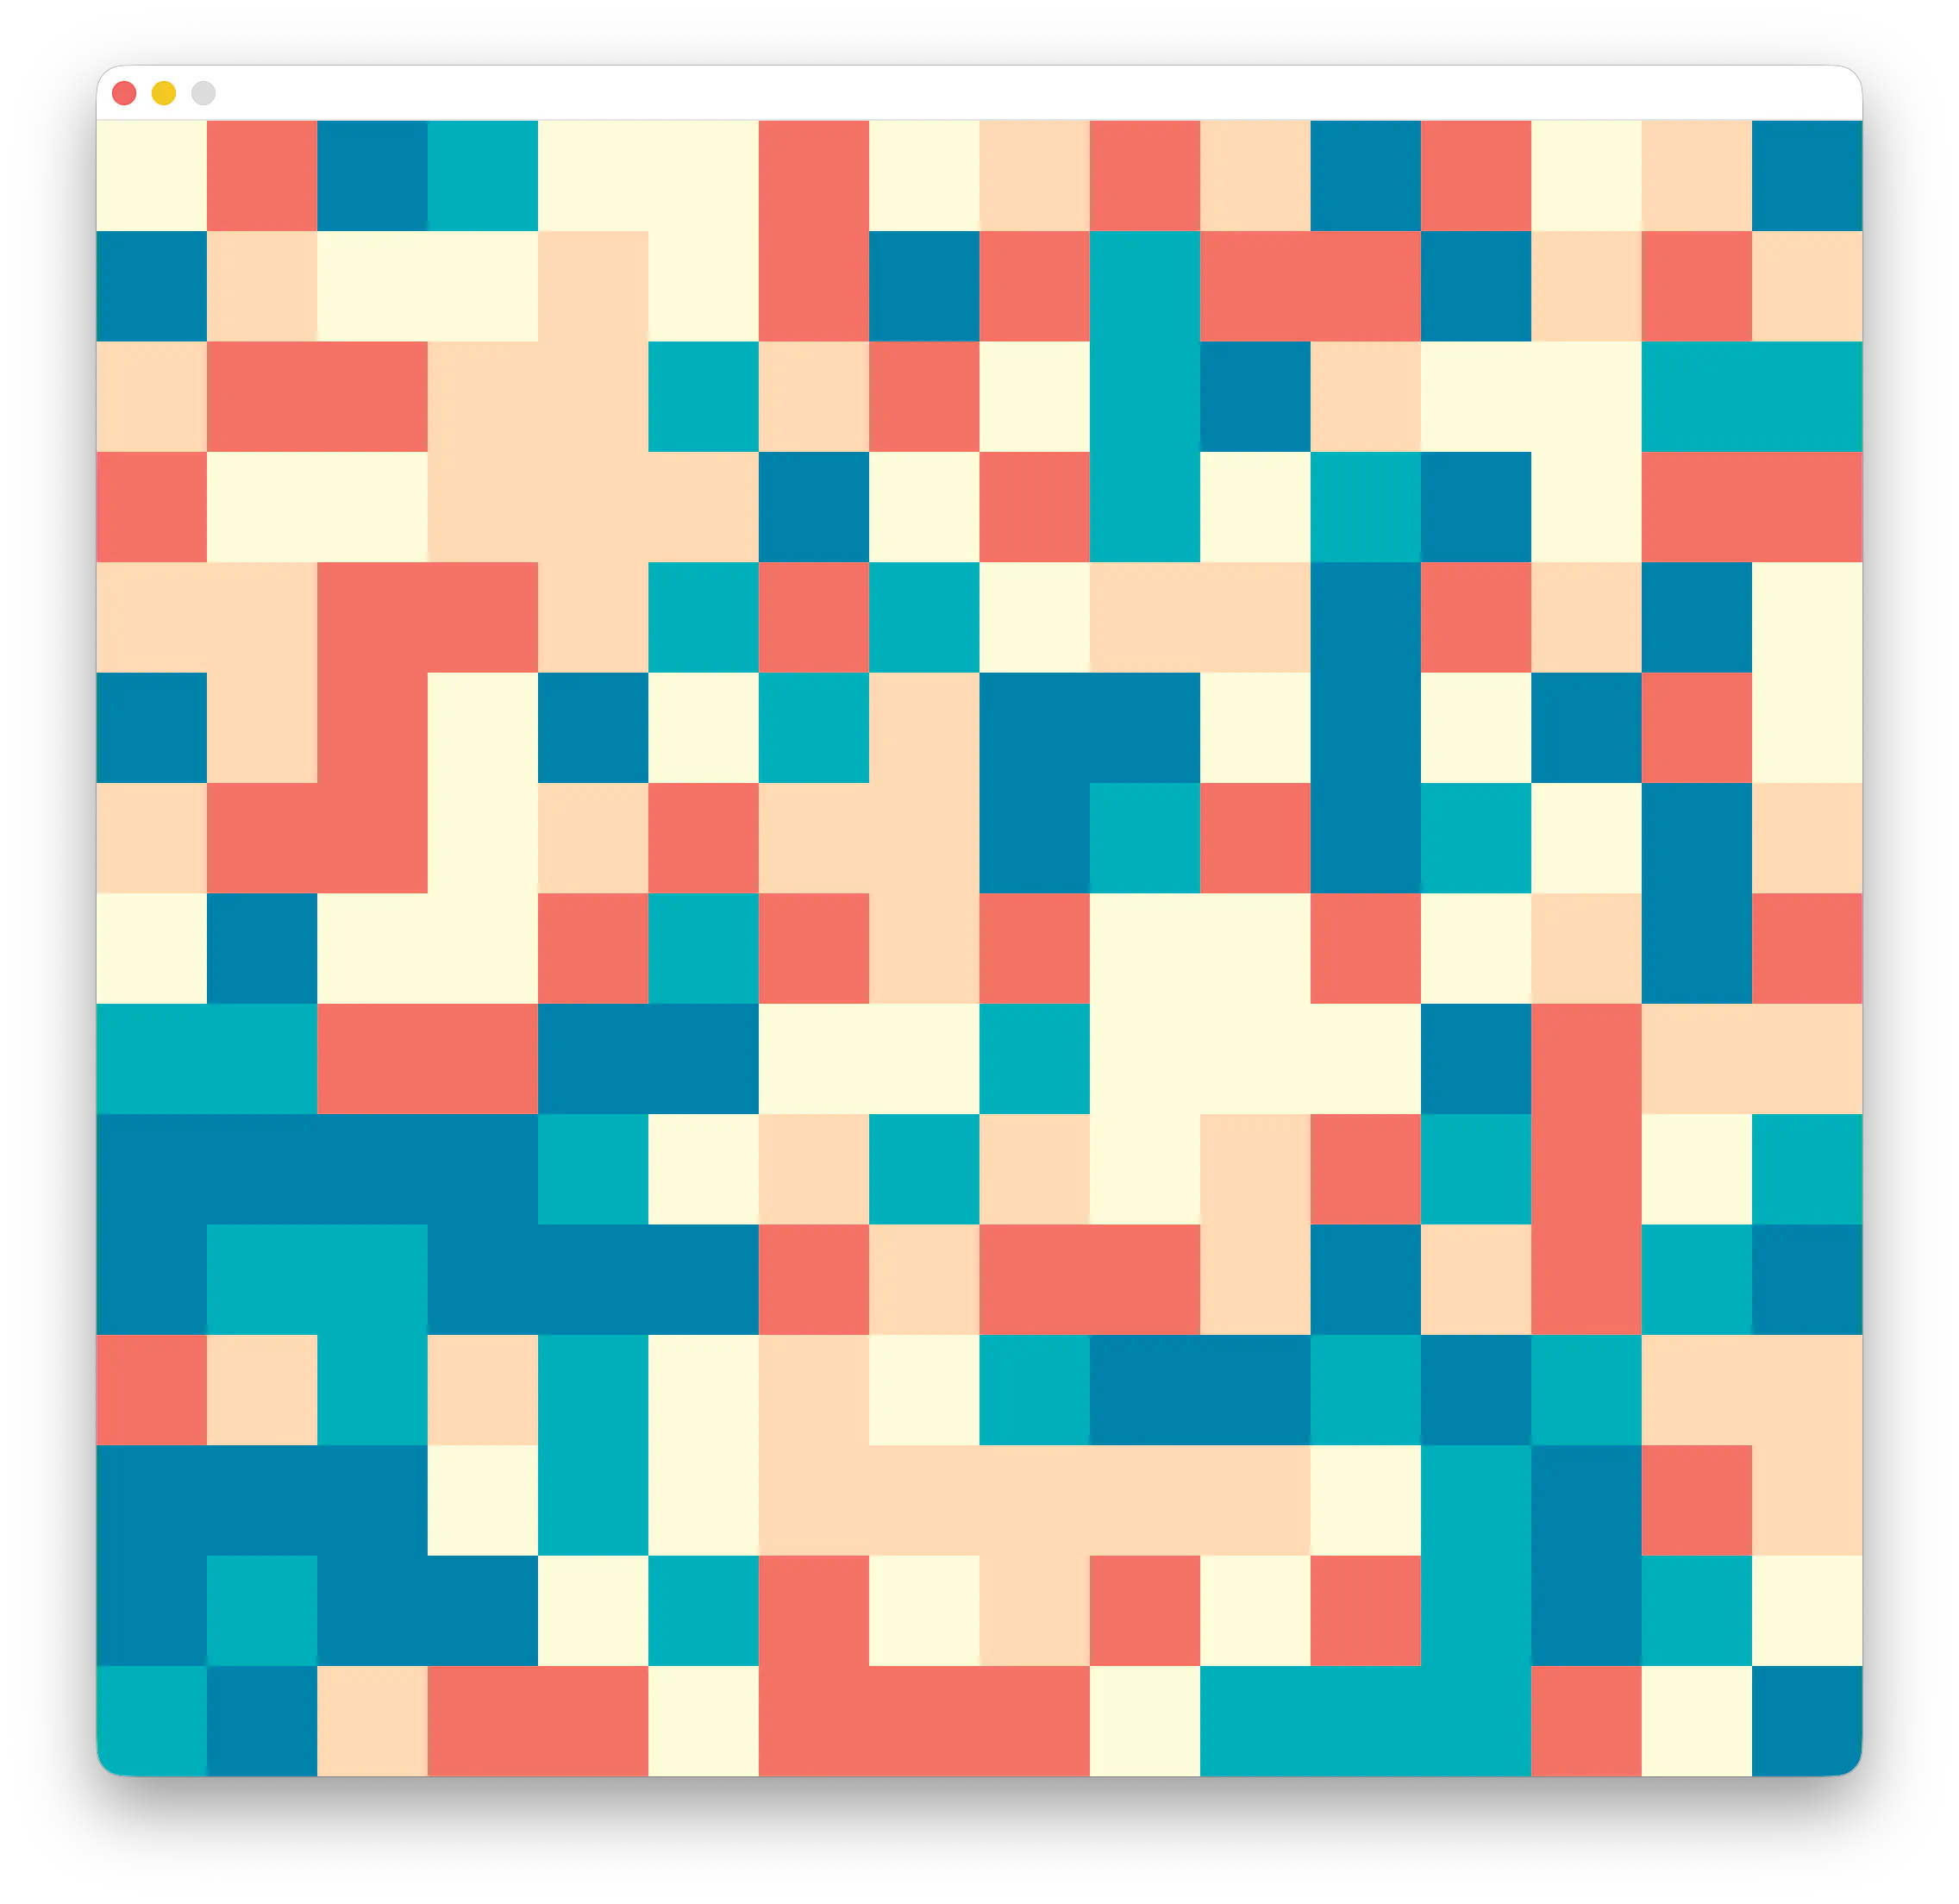
Each tile is an entity. An entity has no attributes by itself. Our game has 240 tiles. To give them meaning, we need to add components to them.
Let’s think of a minimal set of components the entity needs to appear as a tile on the screen.
Without a doubt, it needs a position in the game world, a pair of X and Y coordinates:
type PositionData struct {
	X float64
	Y float64
}
The other thing is the tile’s color. That’s a separate component:
type ColorData struct {
	Color color.Color
}
Now, it would be natural to represent the tile like this:
type Tile struct {
	Position PositionData
	Color    ColorData
}
But this isn’t what we want. As strange as it sounds, our game shouldn’t have a Tile struct. In ECS, there’s no place for a dedicated Tile type. Instead, we have generic entities made of components.
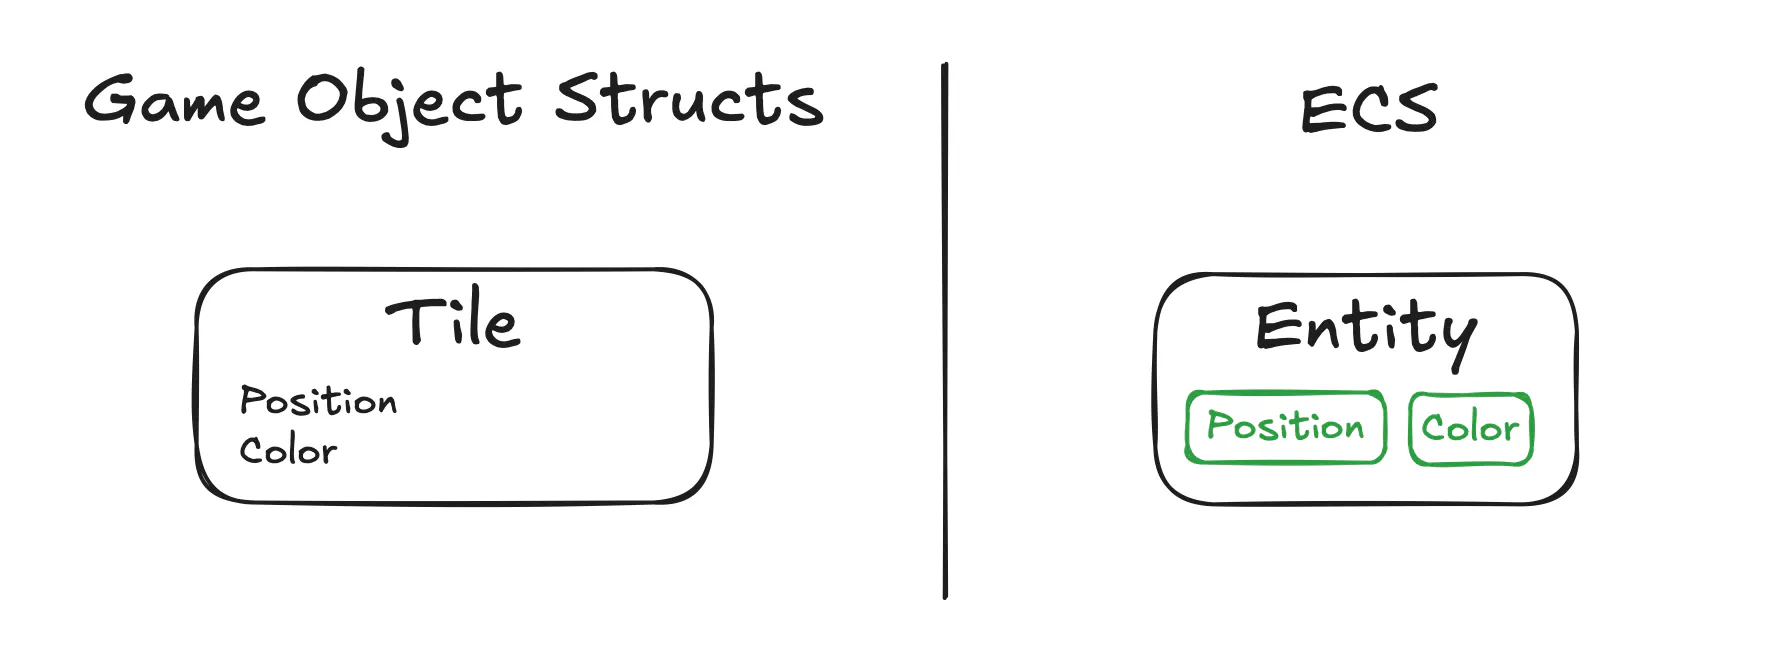
Working with Donburi
Let’s start working with Donburi primitives.
The structs we created above (PositionData and ColorData) hold the components’ data. We need to register component types as well. These are global variables:
import "github.com/yohamta/donburi"

var (
	Position = donburi.NewComponentType[PositionData]()
	Color    = donburi.NewComponentType[ColorData]()
)
To create an entity, we first have to create a world. It’s where Donburi tracks entities. Our game will have a single world with all entities living inside.
world := donburi.NewWorld()
We create an entity for the tile with two components:
entity := world.Create(Position, Color)
The entity lives inside the world from now on. We don’t need to keep track of it. Create returns an integer, because the entity is just an ID.
If we want to interact with the entity, we need to get its entry from the world:
entry := world.Entry(entity)
The entry is a regular Go pointer, and it lets you do something useful with the entity, like reading or setting its component data.
At this point, the entity has two components attached: Position and Color (because we passed them to world.Create()). They hold zero values of their data structs.
We can read their data with the component’s Get method. This may be a bit unusual at first, since we call a method on the global component type, not directly on the entry.
pos := Position.Get(entry)
color := Color.Get(entry)

// pos.X == 0
To set a value, we can use SetValue like this:
Position.SetValue(entry, PositionData{
	X: 100,
	Y: -50,
})
Or by changing the struct in place, since Get returns a pointer:
pos := Position.Get(entry)
pos.X += 10
We can also add or remove components and check if they exist:
if entry.HasComponent(Color) {
	entry.RemoveComponent(Color)
}

entry.AddComponent(Color)
Introducing systems
The last part we need is systems. They are similar to regular Update functions.
As a reminder, here’s a minimal Ebitengine game (I’m skipping the Layout method, which isn’t relevant). Update is called every tick, usually 60 times per second, and Draw is called every frame.
type Game struct {}

func (g *Game) Update() error {
	return nil
}

func (g *Game) Draw(screen *ebiten.Image) {

}
In ECS, we move all the code from Update() and Draw() into systems. While Donburi has an experimental systems feature, I’ll stick to a manual but simpler approach here.
A system is an Update function that works within a given world.
type System interface {
	Update(w donburi.World)
}
We keep the world and a slice of systems in the Game struct. Then, we iterate over the systems in the Update method. Each tick, we update every system in the game.
type Game struct {
	world   donburi.World
	systems []System
}

func (g *Game) Update() error {
	for _, s := range g.systems {
		s.Update(g.world)
	}

	return nil
}
We’ll also keep systems for drawing on the screen. I’ll call this kind of a system a Drawer, following the Go convention:
type Drawer interface {
	Draw(w donburi.World, screen *ebiten.Image)
}
Note that a single system could expose both the Update and Draw methods.
A complete game could look like this:
type Game struct {
	world   donburi.World
	systems []System
	drawers []Drawer
}

func NewGame() *Game {
	return &Game{
		world: createWorld(),
		systems: []System{
			NewClickSystem(),
			NewVelocitySystem(),
		},
		drawers: []Drawer{
			NewRenderingSystem(),
		},
	}
}

func (g *Game) Update() error {
	for _, s := range g.systems {
		s.Update(g.world)
	}

	return nil
}

func (g *Game) Draw(screen *ebiten.Image) {
	for _, d := range g.drawers {
		d.Draw(g.world, screen)
	}
}

func createWorld() donburi.World {
	world := donburi.NewWorld()

	tile := world.Create(Position, Color)
	tileEntry := world.Entry(tile)
	Position.Get(tileEntry).X = 100

	// ...

	return world
}
What makes systems interesting is that each works on a subset of entities with specific components. A single system handles some particular logic relevant only to some entities.
For example, let’s say we want the color on our tiles to change continuously. So we add a system that iterates over all entities with the Color component and updates the Color value.
The key here is that, as far as the systems are aware, there’s no such thing as a tile. There are just entities with components on them. Often, systems are generic and work on a small number of components, without broader context of the entire game. This is unusual at first, but it gives you some interesting ways to design the game.
Drawing the tiles
The first system we’ll add is the rendering system. It takes entities with Color and Position components and draws them on the screen. In this example, the tile size is constant, so that’s all the data we need from each entity.
To see where we’re heading, here’s the game with a debug inspector enabled. Hover over or tap a tile to see its data.
Let’s implement the rendering system. Systems fetch entities with Donburi queries. A query defines which components an entity must have and lets you iterate over the matches.
import (
	"github.com/yohamta/donburi"
	"github.com/yohamta/donburi/filter"
)

query := donburi.NewQuery(
	filter.Contains(Position, Color),
)

// Get all entities with both Position AND Color
for entry := range query.Iter(world) {
	// Do something with entry
}

// A different way to do the same thing
query.Each(world, func(entry *donburi.Entry) {
	// ...
})
We create the query in the constructor and keep it as a field of the system struct, to avoid needless allocations every tick. The heavy lifting happens in Update or Draw.
Here’s the rendering code for our tiles.
type RenderingSystem struct {
	query     *donburi.Query
	tileImage *ebiten.Image
}

func NewRenderingSystem() *RenderingSystem {
	tileImage := ebiten.NewImage(TileSize, TileSize)
	tileImage.Fill(color.White)

	return &RenderingSystem{
		query: donburi.NewQuery(
			filter.Contains(Position, Color),
		),
		tileImage: tileImage,
	}
}

func (r *RenderingSystem) Draw(w donburi.World, screen *ebiten.Image) {
	for entry := range r.query.Iter(w) {
		pos := Position.Get(entry)
		c := Color.Get(entry)

		op := &ebiten.DrawImageOptions{}
		op.GeoM.Translate(pos.X, pos.Y)

		op.ColorScale.ScaleWithColor(c.Color)

		screen.DrawImage(r.tileImage, op)
	}
}
Every frame, for each entity with a Position and a Color, the rendering system tints the white tile image with the entity’s color
and draws it on the screen at the entity’s position.
Now we only need to create tiles with the correct positions and random colors while creating the world.
func createWorld() donburi.World {
	w := donburi.NewWorld()

	for x := range ScreenWidth / TileSize {
		for y := range ScreenHeight / TileSize {
			newTile(w, float64(x*TileSize), float64(y*TileSize))
		}
	}

	return w
}

func newTile(w donburi.World, x, y float64) {
	tile := w.Create(Position, Color)
	entry := w.Entry(tile)

	Position.SetValue(entry, PositionData{
		X: x,
		Y: y,
	})

	Color.SetValue(entry, ColorData{
		Color: tileColors[rand.Intn(len(tileColors))],
	})
}
This example is trivial, of course. The rendering system is not that universal if all it can do is draw tiles. We’re moving to a more complex project soon, but first, let’s add two more systems to this example.
Breaking tiles with a click
To make the tiles a bit less boring, let’s add a way to break them: when you click a tile, it should fall down the screen.
We’ll add two components:
Velocity, so that the tiles move.Rotation, for a bit more dramatic visual effect.
type VelocityData struct {
	X float64
	Y float64

	Rotation float64
}

var Velocity = donburi.NewComponentType[VelocityData]()

type RotationData struct {
	Angle float64
}

var Rotation = donburi.NewComponentType[RotationData]()
We’ll add a VelocitySystem, making the entities move. It’s a good example of a universal system in action. It updates the position and rotation of entities by the set values. We can forget it exists and set velocity on an entity we need to move.
func (v *VelocitySystem) Update(w donburi.World) {
	for entry := range v.query.Iter(w) {
		pos := Position.Get(entry)
		rot := Rotation.Get(entry)
		velocity := Velocity.Get(entry)

		pos.X += velocity.X
		pos.Y += velocity.Y
		rot.Angle += velocity.Rotation
	}
}
Now, we need a system for detecting clicks on the tiles. First, let’s somehow mark the entities that can be clicked, so it’s more explicit. We’ll create a Clickable component.
This component has no data. We use it only to mark that the entity supports clicking on it. For components without data like this, we can use a shortcut from Donburi: a tag.
var Clickable = donburi.NewTag()
We need to include this tag along with the new components when creating an entity:
tile := w.Create(Position, Rotation, Color, Velocity, Clickable)
The ClickSystem can look like this:
func NewClickSystem() *ClickSystem {
	return &ClickSystem{
		query: donburi.NewQuery(
			filter.Contains(Clickable, Velocity),
		),
	}
}

func (c *ClickSystem) Update(w donburi.World) {
	p, ok := pressedPoint()
	if !ok {
		return
	}

	for entry := range c.query.Iter(w) {
		pos := Position.Get(entry)

		if p.X >= pos.X && p.X <= pos.X+TileSize &&
			p.Y >= pos.Y && p.Y <= pos.Y+TileSize {

			velocity := Velocity.Get(entry)
			velocity.X = randomRange(-1, 1)
			velocity.Y = randomRange(1.5, 2.5)
			velocity.Rotation = randomRange(-0.1, 0.1)

			entry.RemoveComponent(Clickable)
		}
	}
}
So once a mouse button is clicked (or the screen is tapped), we iterate over all clickable entities and check if they intersect with the pressed point. If so, we set a random velocity and rotation for the tile. That’s enough to get it moving, since the velocity system picks it up from there.
Finally, we remove the Clickable component, so that it’s not possible to click a falling tile again.
See the end result below:
I also updated the rendering system to take rotation into account. You can see the full source on GitHub.
Hopefully you got a general idea of how Donburi works so far, but such a simple project doesn’t show the benefits of ECS well. Let’s look at another project.
A slightly more complete game
We’ll simulate an aquarium, with the player controlling a friendly pufferfish. It grows by collecting bubbles and needs to avoid other fish around it. The player scores points for the bubbles and loses points by eliminating the poor fish.
Try it yourself (control the pufferfish with WASD; no mobile controls, sorry!).
I won’t describe the entire game step by step, but will mention new patterns I introduced there. The full source is on GitHub.
Join over 20k subscribers of our newsletter and get a free e-book!
Go With The Domain Three Dots Labs
Project structure
For a game this size, it makes sense to split it into packages. One level of packages should be enough.
├── archetype/
│   └── ...
├── assets/
│   └── ...
├── component/
│   └── ...
├── domain/
│   └── ...
├── engine/
│   └── ...
├── event/
│   └── events.go
├── game/
│   └── game.go
├── system/
│   └── ...
└── main.go
game is the entry point, including the Game struct and the initial Donburi world.
component and system packages keep components and systems as described so far.
I like to keep the names singular, so later I get self-explanatory component.Velocity and system.Rendering types.
assets keeps the assets loaded with go:embed for easier distribution. It’s a trivial one in this case, just loading all of them on import. For bigger games, it makes sense to add an asynchronous loader here.
In the engine package, I keep common helper functions that don’t belong anywhere. Things like Timer{}, RandomDuration(), Rect{}, etc. Because they are universal (never specific to the game), it’s easy to copy-paste this package when starting a new game and use them right away.
We’ll get to archetype, domain, and event soon.
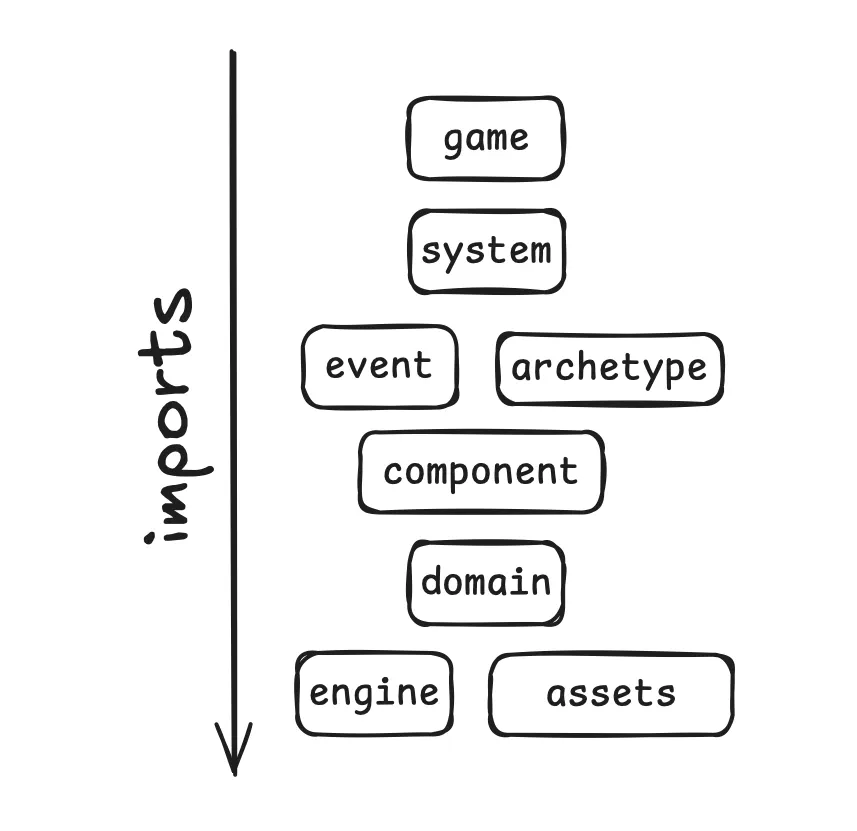
The order of imports goes something like this. A package can’t import anything above it.
Position, rotation, and scale
Donburi comes with the Transform component, which most entities need. It includes the basic data each object in 2D space has: position, rotation, and scale. We no longer need to define them ourselves, as we did in the tiles example.
import (
	"github.com/yohamta/donburi/features/math"
	"github.com/yohamta/donburi/features/transform"
)

// ...

entry := w.Entry(w.Create(transform.Transform))

t := transform.GetTransform(entry)

t.LocalPosition = math.Vec2{X: 50, Y: 0}
t.LocalRotation = 2
t.LocalScale = math.Vec2{X: 2, Y: 2}
The 2D vector (math.Vec2) also comes from Donburi, and it’s just a pair of (X, Y) values. I described working with position, rotation, and scale in detail in the previous post.
Archetypes: constructors for entities
Working with components can get verbose, so I use a high-level API to simplify it. I keep it in the archetype package.
The API uses the builder pattern. New() creates a new entry with the Transform component, and With() adds more components.
In practice, it looks like this:
cam := archetype.New(world).
	With(component.Camera).
	With(component.PositionLimit).
	Entry()
For common objects that can be created in a few places, I also create constructors in the archetype package:
func NewFish(w donburi.World, pos math.Vec2) *donburi.Entry {
	kind := engine.RandomFrom(fishKinds)
	scale := engine.RandomFloatRange(domain.FishMinScale, domain.FishMaxScale)

	fish := New(w).
		WithPosition(pos).
		WithSprite(component.SpriteData{
			Image: kind.Sprite,
			Layer: component.LayerBackground,
		}).
		WithScale(math.Vec2{
			X: scale,
			Y: scale,
		}).
		With(component.Velocity).
		With(component.Drag).
		With(component.PositionLimit).
		With(component.Killable).
		With(kind.AI).
		With(component.Remains).
		WithSpriteBounds().
		Entry()

	component.Remains.SetValue(fish, component.RemainsData{
		Image: kind.Skeleton,
	})

	// ...

	return fish
}
Now, creating a new fish is as simple as:
fish := archetype.NewFish(w, math.Vec2{X: 50, Y: 100})
For some common components like Sprite, I extend the builder so the API is even easier to use. For example, the WithTimeToLive method adds the TimeToLive component and sets its timer to the given duration. It’s easy to extend the API, thanks to keeping it part of the game instead of a generic library.
Parents and children
Transform supports parent-child relationships, which is super handy. When you make an entity a child of another entity, it’s easy to calculate its position, rotation, and scale, taking entities in the hierarchy into account. In other words, you can make it “follow” the parent.
The transform package exposes an API for this:
transform.AppendChild(parent, child, false)
transform.SetParent(child, parent, false)

parent, ok := transform.GetParent(child)
children, ok := transform.GetChildren(parent)
Have you noticed that Transform uses LocalPosition, LocalRotation, and LocalScale? If the entity has no parent, its local position is the same as its world position. But once it has one, the local position is the position relative to the parent. That’s what the false argument to AppendChild and SetParent controls: with true, Donburi recalculates the local position so the child doesn’t move in the world.
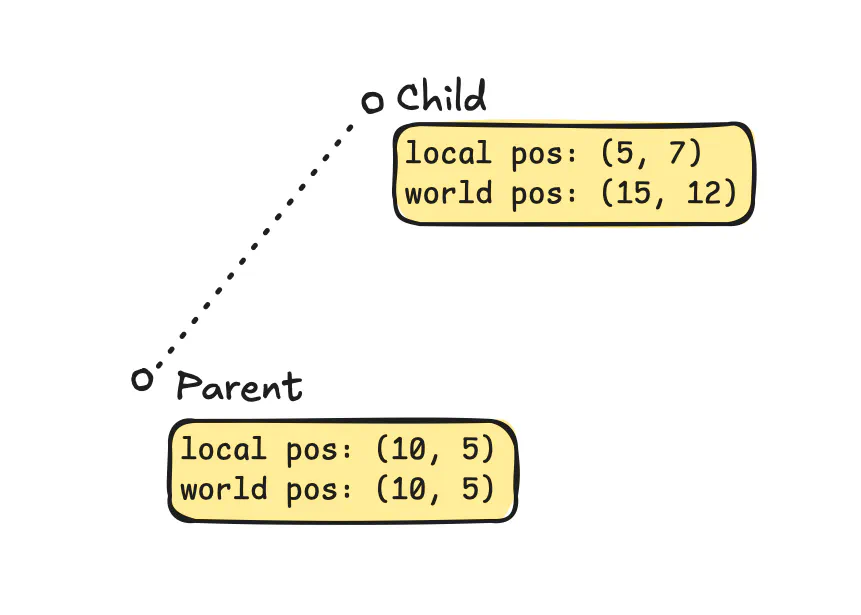
To read the world values, the transform package has functions that return the world position, rotation, and scale. “World” in this context means “Local value plus parent and all grandparents”.
pos := transform.WorldPosition(child)
rotation := transform.WorldRotation(child)
scale := transform.WorldScale(child)
In practice, this means every time we attach an entity as a child to another entity, we only need to worry about setting its local position. All systems using the world position will treat it as being attached to the parent.
We use parent-child relationships when spawning a new bubble. We have a couple of spawner entities in the game world. They are invisible and create new bubbles around them.
When a new bubble appears on a timer, we set its local position:
pos := math.Vec2{
	X: engine.RandomFloatRange(-200, 200),
	Y: engine.RandomFloatRange(-200, 200),
}

bubble := New(w).
	WithParent(parent).
	WithPosition(pos).
	// ...
Because the spawner is set as the parent, we can just get a random distance between -200 and 200, and the bubble will appear within that distance of the spawn point. If we move the spawners, the bubbles will follow them.
Layers and the camera
The rendering system is more universal now. The key element is the Sprite component, representing an image we draw:
type Layer int

const (
	LayerBackground Layer = iota
	LayerPlayer
	LayerForeground
)

type SpriteData struct {
	Image *ebiten.Image
	Layer Layer
	FlipX bool
}

func (s SpriteData) Order() int {
	// Used by ordered query
	return int(s.Layer)
}
We support layers. The lower layers get drawn first on the screen, so higher layers end up on top. The Order() method makes sprites work with Donburi’s ordered queries, which iterate over entities sorted by layer.
Layers are just arbitrary numbers, but we define a few constants. We’ll have all fish in the background, the player on top of them, and the bubbles above everything else.
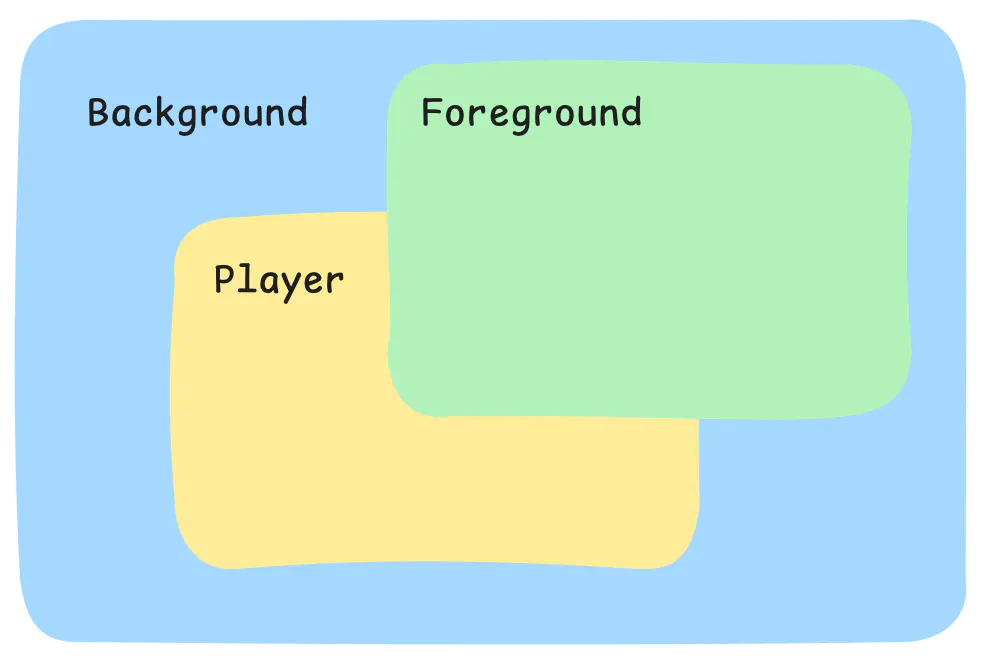
We use a single camera that follows the player. We draw the entire game world on the offscreen image in memory. Then, we paint a portion of it onto the actual screen, offset by the camera position.
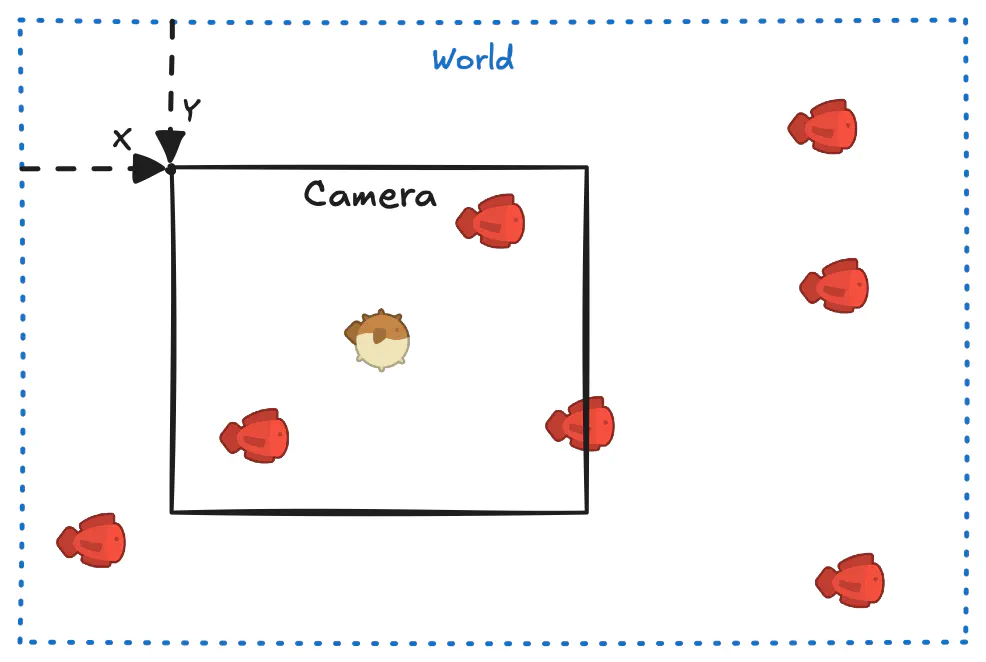
cam, ok := r.cameraQuery.First(w)
if !ok {
	return
}
camPos := transform.WorldPosition(cam)

op := &ebiten.DrawImageOptions{}
op.GeoM.Translate(-camPos.X, -camPos.Y)
screen.DrawImage(r.offscreen, op)
Rendering text
Rendering text is similar to rendering sprites, but simpler. We use a new component:
type TextData struct {
	Text string
}
We draw entities with this component the same way we draw sprites, but with text instead. This could be improved by extending the component data with things like text color, font size, alignment, etc.
Because of the order of drawers, text will always appear on top of the sprites. For our use case, that’s good enough.
g.drawers = []Drawer{
	system.NewRendering(),
	system.NewTextRendering(),
}
Composition in practice
Here’s a comparison of some of the entities and components we use:
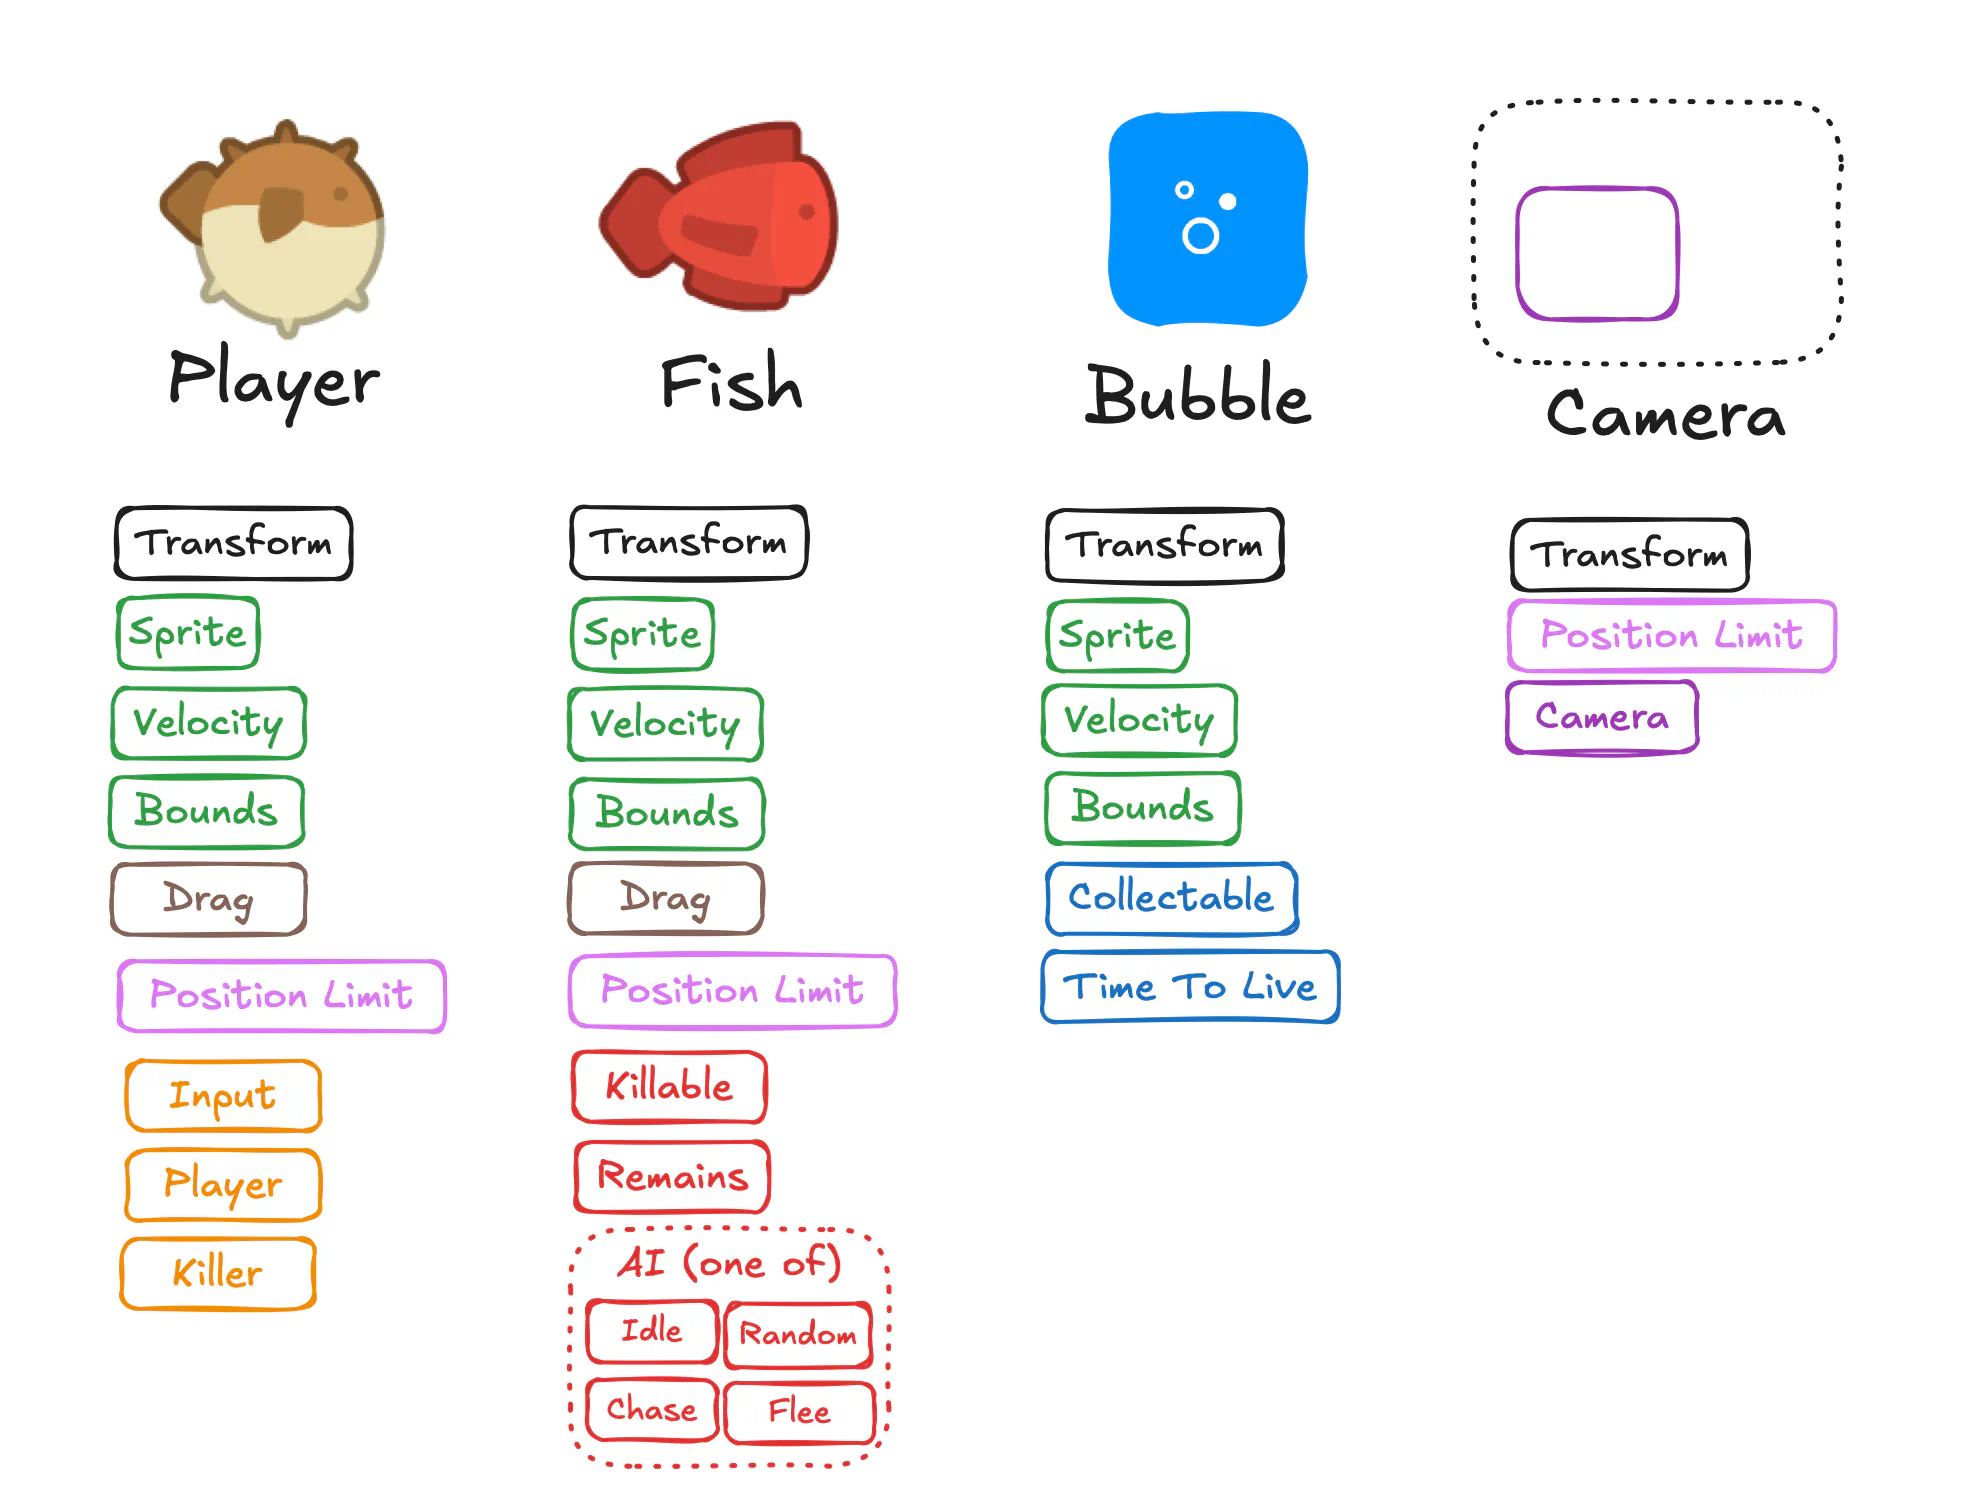
Tip
Components aren’t just buckets for data, but they should give you a clear idea of what can happen with the entity. Try to find names that clearly describe what the component represents.
Movement and controls
We use a similar Velocity system to the one in the previous example.
I wanted to make controls feel a bit like swimming, so there’s also the Drag system. It reduces the velocity of entities with the Drag component over time. This way, after you press a movement button, the player moves for a bit and gradually stops.
Drag also works on other fish, but not on bubbles, which have constant upward velocity. This is an example of how you can control which entities a system handles, and which it doesn’t. Drag is a tag, so it enables or disables the behavior for the chosen entities. We could also dynamically add or remove it.
Keeping entities within world boundaries
We use the same mechanism to limit the camera, player, and fish positions, so they never leave the world edges.
component.PositionLimit.SetValue(player, component.PositionLimitData{
	Min: math.Vec2{},
	Max: math.Vec2{X: domain.MapWidth, Y: domain.MapHeight},
})
For the camera, we adjust the limit based on the screen dimensions:
component.PositionLimit.SetValue(cam, component.PositionLimitData{
	Min: math.Vec2{X: 0, Y: 0},
	Max: math.Vec2{X: domain.MapWidth - ScreenWidth, Y: domain.MapHeight - ScreenHeight},
})
Note how the limit system works the same for entities as different as the camera and the player, with a slight adjustment of the boundaries.
We don’t add the PositionLimit component to the bubbles, because they can escape upwards.
Fish behaviors
I thought it would be fun to give each fish color a different behavior, like ghosts in Pac-Man:
- Blue fish are idle, moving up and down and left and right just a bit.
- Orange fish choose a cardinal direction and swim for a bit.
- Red fish chase the player, then step away once they get close.
- Green fish slowly swim towards the player, then quickly flee once they get close.
Each type needs a different state (timers and other data). Instead of using a single component, I decided to go with four, one for each AI type. But there’s still one system. I used a query that combines any of the components:
query: donburi.NewQuery(
	filter.Or(
		filter.Contains(component.IdleAI),
		filter.Contains(component.RandomMovementAI),
		filter.Contains(component.ChasePlayerAI),
		filter.Contains(component.FleePlayerAI),
	),
),
Then, I branch out:
for entry := range a.query.Iter(w) {
	if entry.HasComponent(component.IdleAI) {
		a.handleIdleAI(entry)
	} else if entry.HasComponent(component.RandomMovementAI) {
		a.handleRandomMovementAI(entry)
	} else if entry.HasComponent(component.ChasePlayerAI) {
		a.handleChasePlayerAI(w, entry)
	} else if entry.HasComponent(component.FleePlayerAI) {
		a.handleFleePlayerAI(w, entry)
	} else {
		panic("entity has AI component but no known AI type")
	}
}
Four systems would work just as well. I chose a bit less boilerplate.
Bounds smaller than the sprite
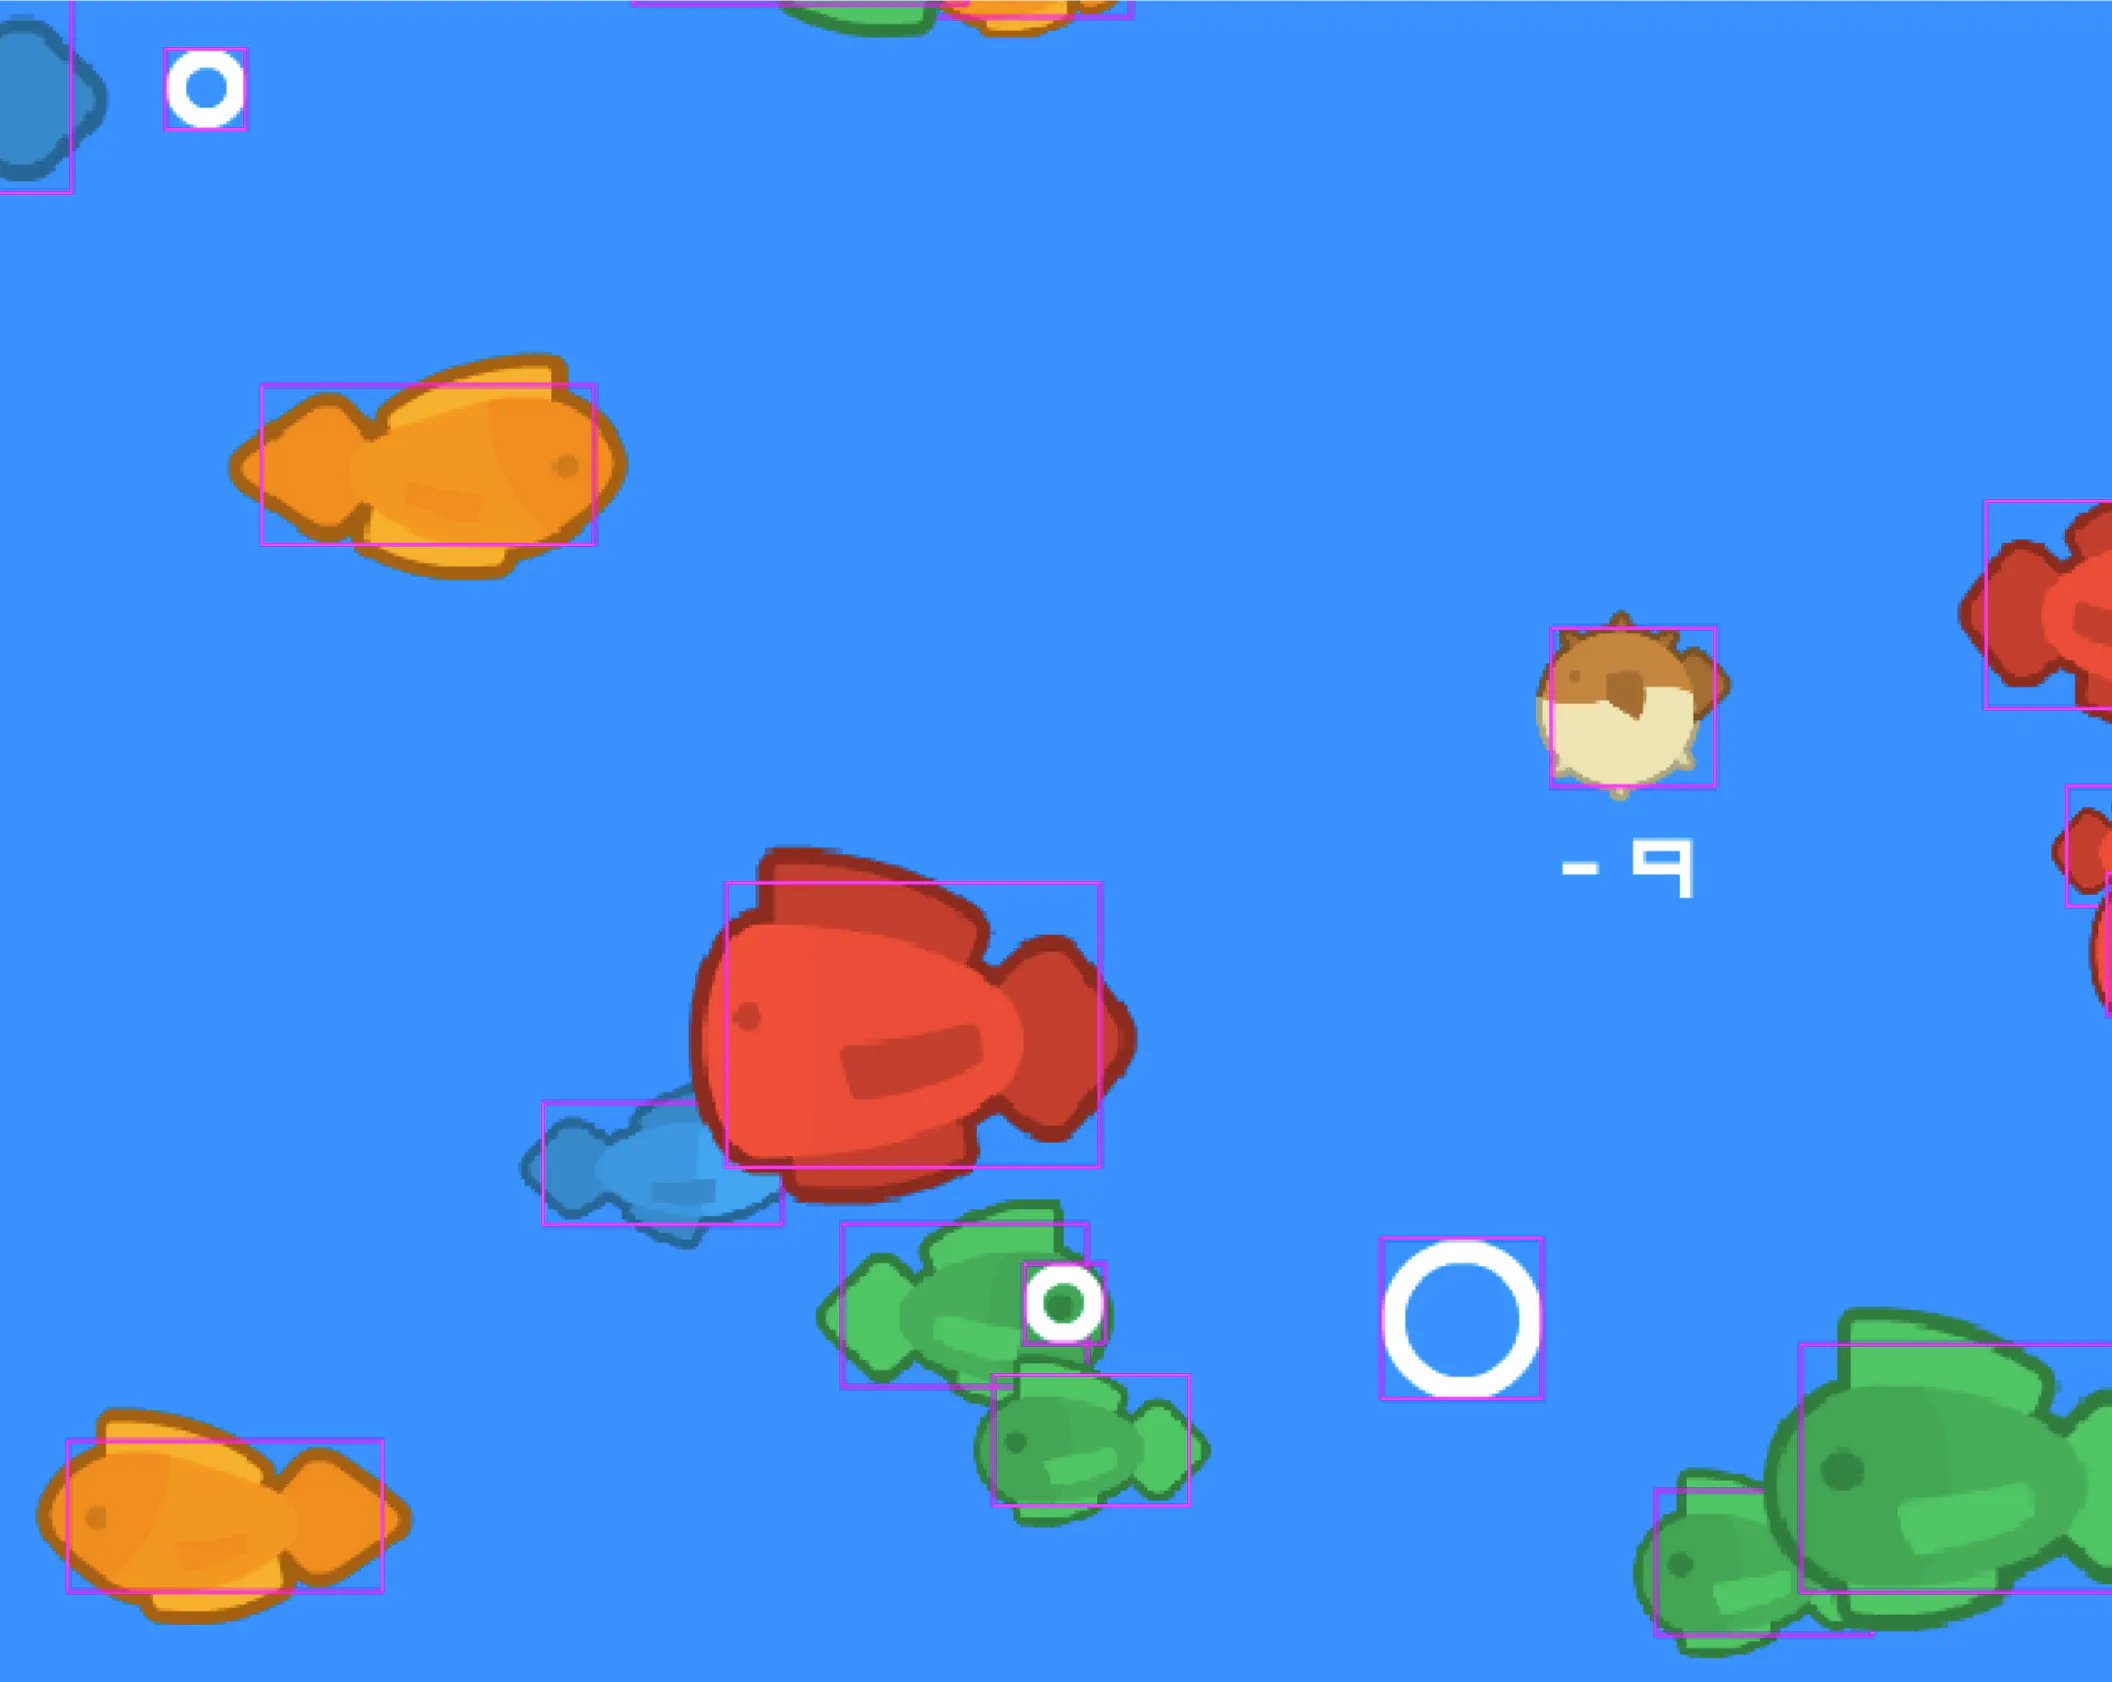
Bounds is a component that represents the entity’s boundaries in the game world. For example, we use it to check collisions. It’s the entity’s 2D dimensions.
type BoundsData struct {
	Width  float64
	Height float64
}
The simplest way is to use the image size as bounds. But we create a separate component to have more control over the dimensions.
We make the bounds a bit smaller than the image. This reduces the collision area. Otherwise, the player would collide with the fish by touching the transparent parts, which would be unintuitive and annoying.
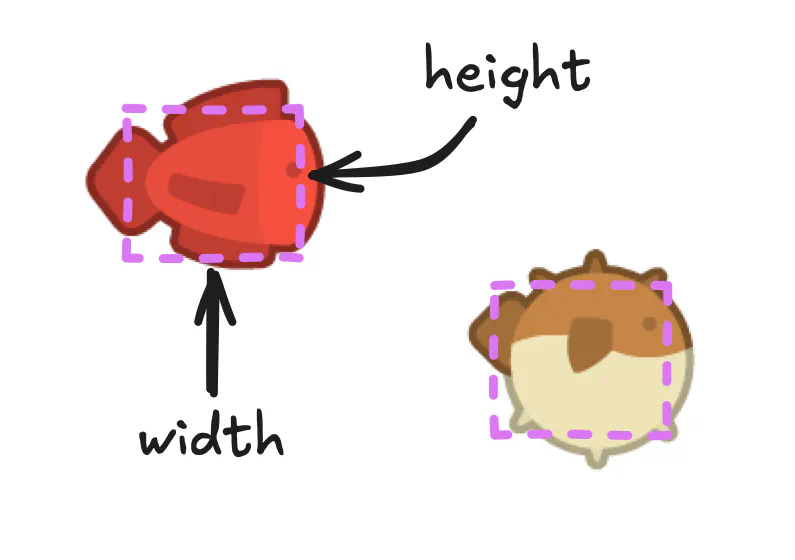
We create a Rect() method that returns a struct filled with the entity’s position together with the bounds, taking scale into account.
func (d BoundsData) Rect(e *donburi.Entry) engine.Rect {
	scale := transform.WorldScale(e)
	pos := transform.WorldPosition(e)
	w := d.Width * scale.X
	h := d.Height * scale.Y
	return engine.NewRect(pos.X-w/2, pos.Y-h/2, w, h)
}
Taking scale into account matters because we’ll use different scales for the fish, and the player’s scale will change during gameplay. All logic related to the boundaries needs to consider this.
Calling this method is a bit unusual because of how components work. The BoundsData struct keeps only the dimensions, so we also need to pass the entry to Rect to get the current position.
bounds := component.Bounds.Get(entry)
rect := bounds.Rect(entry)

if rect.Intersects(anotherRect) {
	// ...
}
There’s a trivial Debug system that flips a boolean debug flag. When the flag is on, the rendering system draws the bounds around the sprites.
Decoupling systems with events
Donburi supports events. It’s a simple mechanism, as we still have one game loop running. We don’t do any asynchronous processing.
Instead, we publish events in memory and process them each tick, which means we call all functions that have subscribed to them.
I like working with events because they let you decouple concepts in the game. Many game elements are connected, and over time the logic becomes full of calls to different parts, which is hard to follow.
Let’s consider the Kill system from our game. We look for intersections between a killer (the player object) and a killable (other fish). Once they intersect, we destroy the fish and reduce the player’s points.
func (k *Kill) Update(w donburi.World) {
	for killerEntry := range k.killerQuery.Iter(w) {
		for killableEntry := range k.killableQuery.Iter(w) {
			killerBounds := component.Bounds.Get(killerEntry)
			killableBounds := component.Bounds.Get(killableEntry)

			if killerBounds.Rect(killerEntry).Intersects(killableBounds.Rect(killableEntry)) {
				component.Destroy(killableEntry)

				// TODO Take points out of player's score
			}
		}
	}
}
The thing is, adding scoring logic here feels beyond the responsibility of this system. It would work just fine, but note how generic the system is now. It doesn’t know anything about fish or the player. It just makes sure that a killer destroys a killable it intersects with.
So we define a Killed event in the event package:
import "github.com/yohamta/donburi/features/events"

type KilledData struct {
	Points int
}

var Killed = events.NewEventType[KilledData]()
And publish it in the Kill system:
if killerBounds.Rect(killerEntry).Intersects(killableBounds.Rect(killableEntry)) {
	component.Destroy(killableEntry)

	event.Killed.Publish(w, event.KilledData{
		Points: component.Killable.Get(killableEntry).Points,
	})
}
We define event handlers on systems, since that is where most of the game’s logic lives. The Scoring system subscribes to the Killed and Collected events.
func (s *Scoring) Subscribe(w donburi.World) {
	event.Killed.Subscribe(w, s.onKilled)
	event.Collected.Subscribe(w, s.onCollected)
}

func (s *Scoring) onKilled(w donburi.World, e event.KilledData) {
	s.updateScore(w, e.Points)
}

func (s *Scoring) onCollected(w donburi.World, e event.CollectedData) {
	s.updateScore(w, e.Points)
}
We call Subscribe once, right after creating the world. We process the events in the main Update method. Note that events also live in Donburi’s world.
 func (g *Game) Update() error {
 	for _, s := range g.systems {
 		s.Update(g.world)
 	}

+	events.ProcessAllEvents(g.world)

 	return nil
 }
Deferred Destroy
To remove an entity from the world, you can call entry.Remove(). But another system down the stack might still have a leftover reference to it, and then your game will crash. You can check if the entity is valid with entry.Valid(), but it adds a lot of noise to the logic code.
I kept running into this issue over and over, and finally changed the approach.
Instead of removing the entities, we mark them as destroyed with a tag. We can use a helper method:
var Destroyed = donburi.NewTag()

func Destroy(e *donburi.Entry) {
	if !e.Valid() {
		return
	}
	if !e.HasComponent(Destroyed) {
		e.AddComponent(Destroyed)
	}
}
The Destroy system cleans up the destroyed entities, like a garbage collector. RemoveRecursive also removes all children in the hierarchy.
func (d *Destroy) Update(w donburi.World) {
	for entry := range d.query.Iter(w) {
		transform.RemoveRecursive(entry)
	}
}
The order of systems usually doesn’t matter, but here it’s important. Destroy is the last system in the stack, to give other systems a chance to process the entity before it’s removed for good.
Note the Remains system, which leaves a skeleton where a fish died. It queries destroyed entities and needs to run before they are removed for good.
 g.systems = []System{
 	// ...
 	system.NewKill(),
 	system.NewTimeToLive(),
 	system.NewRemains(),
+	system.NewDestroy(),
 }
Game rules in the domain package
For a while, I looked for a good place to keep some of the game’s constants, like the movement speed, initial health points, etc. When you hardcode these values in systems, updating them is annoying.
Similarly, there is often some logic inside systems that’s more related to the inherent game rules than how it works in Ebitengine or Donburi. For example, how some effects stack or how damage is calculated.
I keep this kind of code in the domain package. I took the name from DDD because it felt the most natural to me. The key is that it’s separate, doesn’t import any other game packages, and it’s easy to change and test.
package domain

import "time"

const (
	FishKillPenalty = -10

	FishMinScale = 0.4
	FishMaxScale = 1.2

	ChaseFallBackDistance = 75.0
	ChaseRange            = 400.0
	FleeDistance          = 150.0

	BubbleTimeToLive  = 60 * time.Second
	RemainsTimeToLive = 3 * time.Minute
)

func FishSpeed(base float64, scale float64) float64 {
	return base / scale
}
For example, we use the domain rule that “big fish swim slower” in a few spots in the fish AI system. If we wanted to change how it’s calculated, or what else it depends on, we’d change it in one place.
speed := domain.FishSpeed(engine.RandomFloatRange(0.7, 1.2), t.LocalScale.X)
The domain package is a great place for all kinds of testing, since it’s pure logic and doesn’t need the rest of the game engine to work.
You could also build a way to change the domain constants live during gameplay for easier playtesting. Choosing these values is often key to making the game fun to play.
Singletons as entities
Sometimes, you need a single copy of an object to track data. For example, I keep the screen size and debug toggle in the Settings component. There’s always a single instance of it in the world, and I use a dedicated MustFindSettings() function to get it.
type SettingsData struct {
	ScreenWidth  int
	ScreenHeight int

	Debug bool
}

var Settings = donburi.NewComponentType[SettingsData]()

var settingsQuery = donburi.NewQuery(filter.Contains(Settings))

func MustFindSettings(w donburi.World) *SettingsData {
	entry, ok := settingsQuery.First(w)
	if !ok {
		panic("settings not found")
	}

	return Settings.Get(entry)
}
An alternative would be to use a global variable. But I like to stick to the ECS primitives because the world is already passed everywhere, and it’s easy to query what you need from it.
We could also cache these singletons inside systems instead of fetching them every tick. The problems start once you do something unusual, like restarting the level, loading a game, or testing with multiple world instances. I prefer to keep the systems completely stateless, so that the world you pass to Update() keeps the entire game state.
Don’t overuse singletons. We have a single camera and player instance now, but it could take the game in an interesting direction if we added more. ECS works best when you don’t treat the entities as unique snowflakes.
When ECS shines
Here’s an example of how the game can change with a few lines of code. Controlling the player works thanks to the Input component. Try adding it to the fish on collision, instead of destroying them:
-component.Destroy(killableEntry)
+killableEntry.AddComponent(component.Input)
+// Copy the component data over from the player
+component.Input.SetValue(killableEntry, component.Input.GetValue(killerEntry))
The fish now start following the player’s moves. But they keep their AI, too, so we need to keep moving to keep them close. Maybe that’s an interesting mechanic? I didn’t plan it beforehand, but I came across it while experimenting with the components. Note we didn’t have to touch the systems at all, because they are generic enough to work with many component configurations.
When ECS is too much
As much as I like working with ECS, it’s not a silver bullet. It works great in games that simulate many objects with similar behaviors, as we’ve seen so far.
But for many projects, it can feel like too much boilerplate and code scattered with no benefit.
You can’t open the entity’s code and read through its logic, because it’s spread across systems.
It can be difficult to track bugs that happen when systems interact with each other. Not all logic can be captured as an elegant, standalone Update function.
I sometimes choose a hybrid approach for entities that are an exception.
A simple Script component with a custom Update function can work fine. I’ll just code the custom logic for the specific entity instead of forcing multiple systems to make it work.
type ScriptData struct {
	Update func(entry *donburi.Entry)
}
You can also run custom logic in Ebitengine’s Update() and Draw() methods next to the systems. Donburi is easy to plug in where you need it, so you don’t need to go all in. For example, you could keep the game’s UI out of it.
Evolving your engine
What I described above isn’t an up-front design I made up, but what I ended up with after making games with this architecture and tweaking the approach as I went. Don’t treat it as a definitive guide, but rather as a starting point, and take it from here.
I like how polishing the approach made the next games easier. (Obviously, starting projects is way more fun than finishing them. 😅) It freed me from the constant “how to model this?” questions. Instead, I have some familiar ground to start with.
Specifically, it’s easy to copy components and systems between games. Many, like rendering, are universal and can be slightly adjusted, so you never start from zero.
Making games with AI agents
I’m experimenting a lot these days. I also tried making games with agents while keeping the architecture I’m used to. It’s a lot of fun to describe what you have in mind and have quite a polished version in front of you in minutes.
But working this way makes you less involved in the project. As the game gets more complex, you no longer have a clear idea of how everything ties together. That may also be true with old-school typing, but I feel it happens sooner when using AI.
Another downside is that it’s much more tempting to create new features (because it’s so quick) than to polish existing ones and playtest the game so it’s fun to play. Not a big deal if you’re just having fun. But I think there’s value in going through the whole process yourself, although I can’t yet name it precisely.
Gamedev can get ridiculously complex, but many parts work the same way across games. To keep the games built by agents in a familiar structure, I boiled down the approach from my earlier Ebitengine and Donburi games into patterns: Markdown files that agents can follow.
A couple of thoughts before you see the patterns:
- These are regular Markdown files, not some specialized skills. I don’t think any more structure is needed: recent models are smart enough to pick them up with a one-line hint.
- They are not some secret spells that will make a great game. They worked well for me because I already know the architecture and I feel good working in it.
- I did not review all of them. They’re not supposed to work as linters, but to give LLMs a general direction that I can verify if needed.
- I coded the Tiles and Pufferfish games by hand (with pleasure!), so I didn’t use the patterns for them. They follow the same ideas, though.
You’ll find the files in the patterns directory.
More examples
You can find the full source for both games on GitHub.
If you want to see the code for bigger projects, here are some (unfinished 🥴) games I built with the same approach:
- A Night in Innsmouth, a narrative game based on the prose of H. P. Lovecraft.
- Kingdoms, a strategy game with terrain generation.
- Witchcraft, a local battle arena with different classes and spells.
Thanks for reading and have fun making your own games! If you found it useful or would like to read more about some topic, let me know in the comments.