Running integration tests with docker-compose in Google Cloud Build

This post is a direct follow-up to Microservices test architecture where I introduced new kinds of tests to our example project.
Wild Workouts uses Google Cloud Build as its CI/CD platform. It’s configured for continuous deployment, meaning changes land on production as soon as the pipeline passes.
Note
State of this article in 2026
This article is kept as an archive. As of 2026, GitHub Actions is our default choice for CI/CD. It’s simpler to set up, more widely adopted, and integrates seamlessly with GitHub repositories.
The core concepts in this article—running integration tests with docker-compose, testing against real dependencies, and structuring your test pipeline—remain relevant regardless of which CI/CD platform you choose. The patterns shown here translate directly to GitHub Actions or any other CI system that supports Docker.
If you consider our current setup, it’s both brave and naive. We have no tests running that could save us from obvious mistakes (the not-so-obvious mistakes can rarely be caught by tests, anyway).
In this article I will show how to run integration, component, and end-to-end tests on Google Cloud Build using docker-compose.
Note
This is not just another article with random code snippets.
This post is part of a bigger series where we show how to build Go applications that are easy to develop, maintain, and fun to work with in the long term. We are doing it by sharing proven techniques based on many experiments we did with teams we lead and scientific research.
You can learn these patterns by building with us a fully functional example Go web application – Wild Workouts.
We did one thing differently – we included some subtle issues to the initial Wild Workouts implementation. Have we lost our minds to do that? Not yet. 😉 These issues are common for many Go projects. In the long term, these small issues become critical and stop adding new features.
It’s one of the essential skills of a senior or lead developer; you always need to keep long-term implications in mind.
We will fix them by refactoring Wild Workouts. In that way, you will quickly understand the techniques we share.
Do you know that feeling after reading an article about some technique and trying implement it only to be blocked by some issues skipped in the guide? Cutting these details makes articles shorter and increases page views, but this is not our goal. Our goal is to create content that provides enough know-how to apply presented techniques. If you did not read previous articles from the series yet, we highly recommend doing that.
We believe that in some areas, there are no shortcuts. If you want to build complex applications in a fast and efficient way, you need to spend some time learning that. If it was simple, we wouldn’t have large amounts of scary legacy code.
Here’s the full list of 14 articles released so far.
The full source code of Wild Workouts is available on GitHub. Don’t forget to leave a star for our project! ⭐
The current config
Let’s look at the current cloudbuild.yaml file. While it’s simple, most steps run several times
because we keep three microservices in a single repository. I’ll focus on the backend part and skip all config related to
frontend deployment.
steps:
  - id: trainer-lint
    name: golang
    entrypoint: ./scripts/lint.sh
    args: [trainer]
  - id: trainings-lint
    name: golang
    entrypoint: ./scripts/lint.sh
    args: [trainings]
  - id: users-lint
    name: golang
    entrypoint: ./scripts/lint.sh
    args: [users]

  - id: trainer-docker
    name: gcr.io/cloud-builders/docker
    entrypoint: ./scripts/build-docker.sh
    args: ["trainer", "$PROJECT_ID"]
    waitFor: [trainer-lint]
  - id: trainings-docker
    name: gcr.io/cloud-builders/docker
    entrypoint: ./scripts/build-docker.sh
    args: ["trainings", "$PROJECT_ID"]
    waitFor: [trainings-lint]
  - id: users-docker
    name: gcr.io/cloud-builders/docker
    entrypoint: ./scripts/build-docker.sh
    args: ["users", "$PROJECT_ID"]
    waitFor: [users-lint]

  - id: trainer-http-deploy
    name: gcr.io/cloud-builders/gcloud
    entrypoint: ./scripts/deploy.sh
    args: [trainer, http, "$PROJECT_ID"]
    waitFor: [trainer-docker]
  - id: trainer-grpc-deploy
    name: gcr.io/cloud-builders/gcloud
    entrypoint: ./scripts/deploy.sh
    args: [trainer, grpc, "$PROJECT_ID"]
    waitFor: [trainer-docker]
  - id: trainings-http-deploy
    name: gcr.io/cloud-builders/gcloud
    entrypoint: ./scripts/deploy.sh
    args: [trainings, http, "$PROJECT_ID"]
    waitFor: [trainings-docker]
  - id: users-http-deploy
    name: gcr.io/cloud-builders/gcloud
    entrypoint: ./scripts/deploy.sh
    args: [users, http, "$PROJECT_ID"]
    waitFor: [users-docker]
  - id: users-grpc-deploy
    name: gcr.io/cloud-builders/gcloud
    entrypoint: ./scripts/deploy.sh
    args: [users, grpc, "$PROJECT_ID"]
    waitFor: [users-docker]
Notice the waitFor key. It makes a step wait only for other specified steps. Some jobs can run in parallel this way.
Here’s a more readable version of what’s going on:
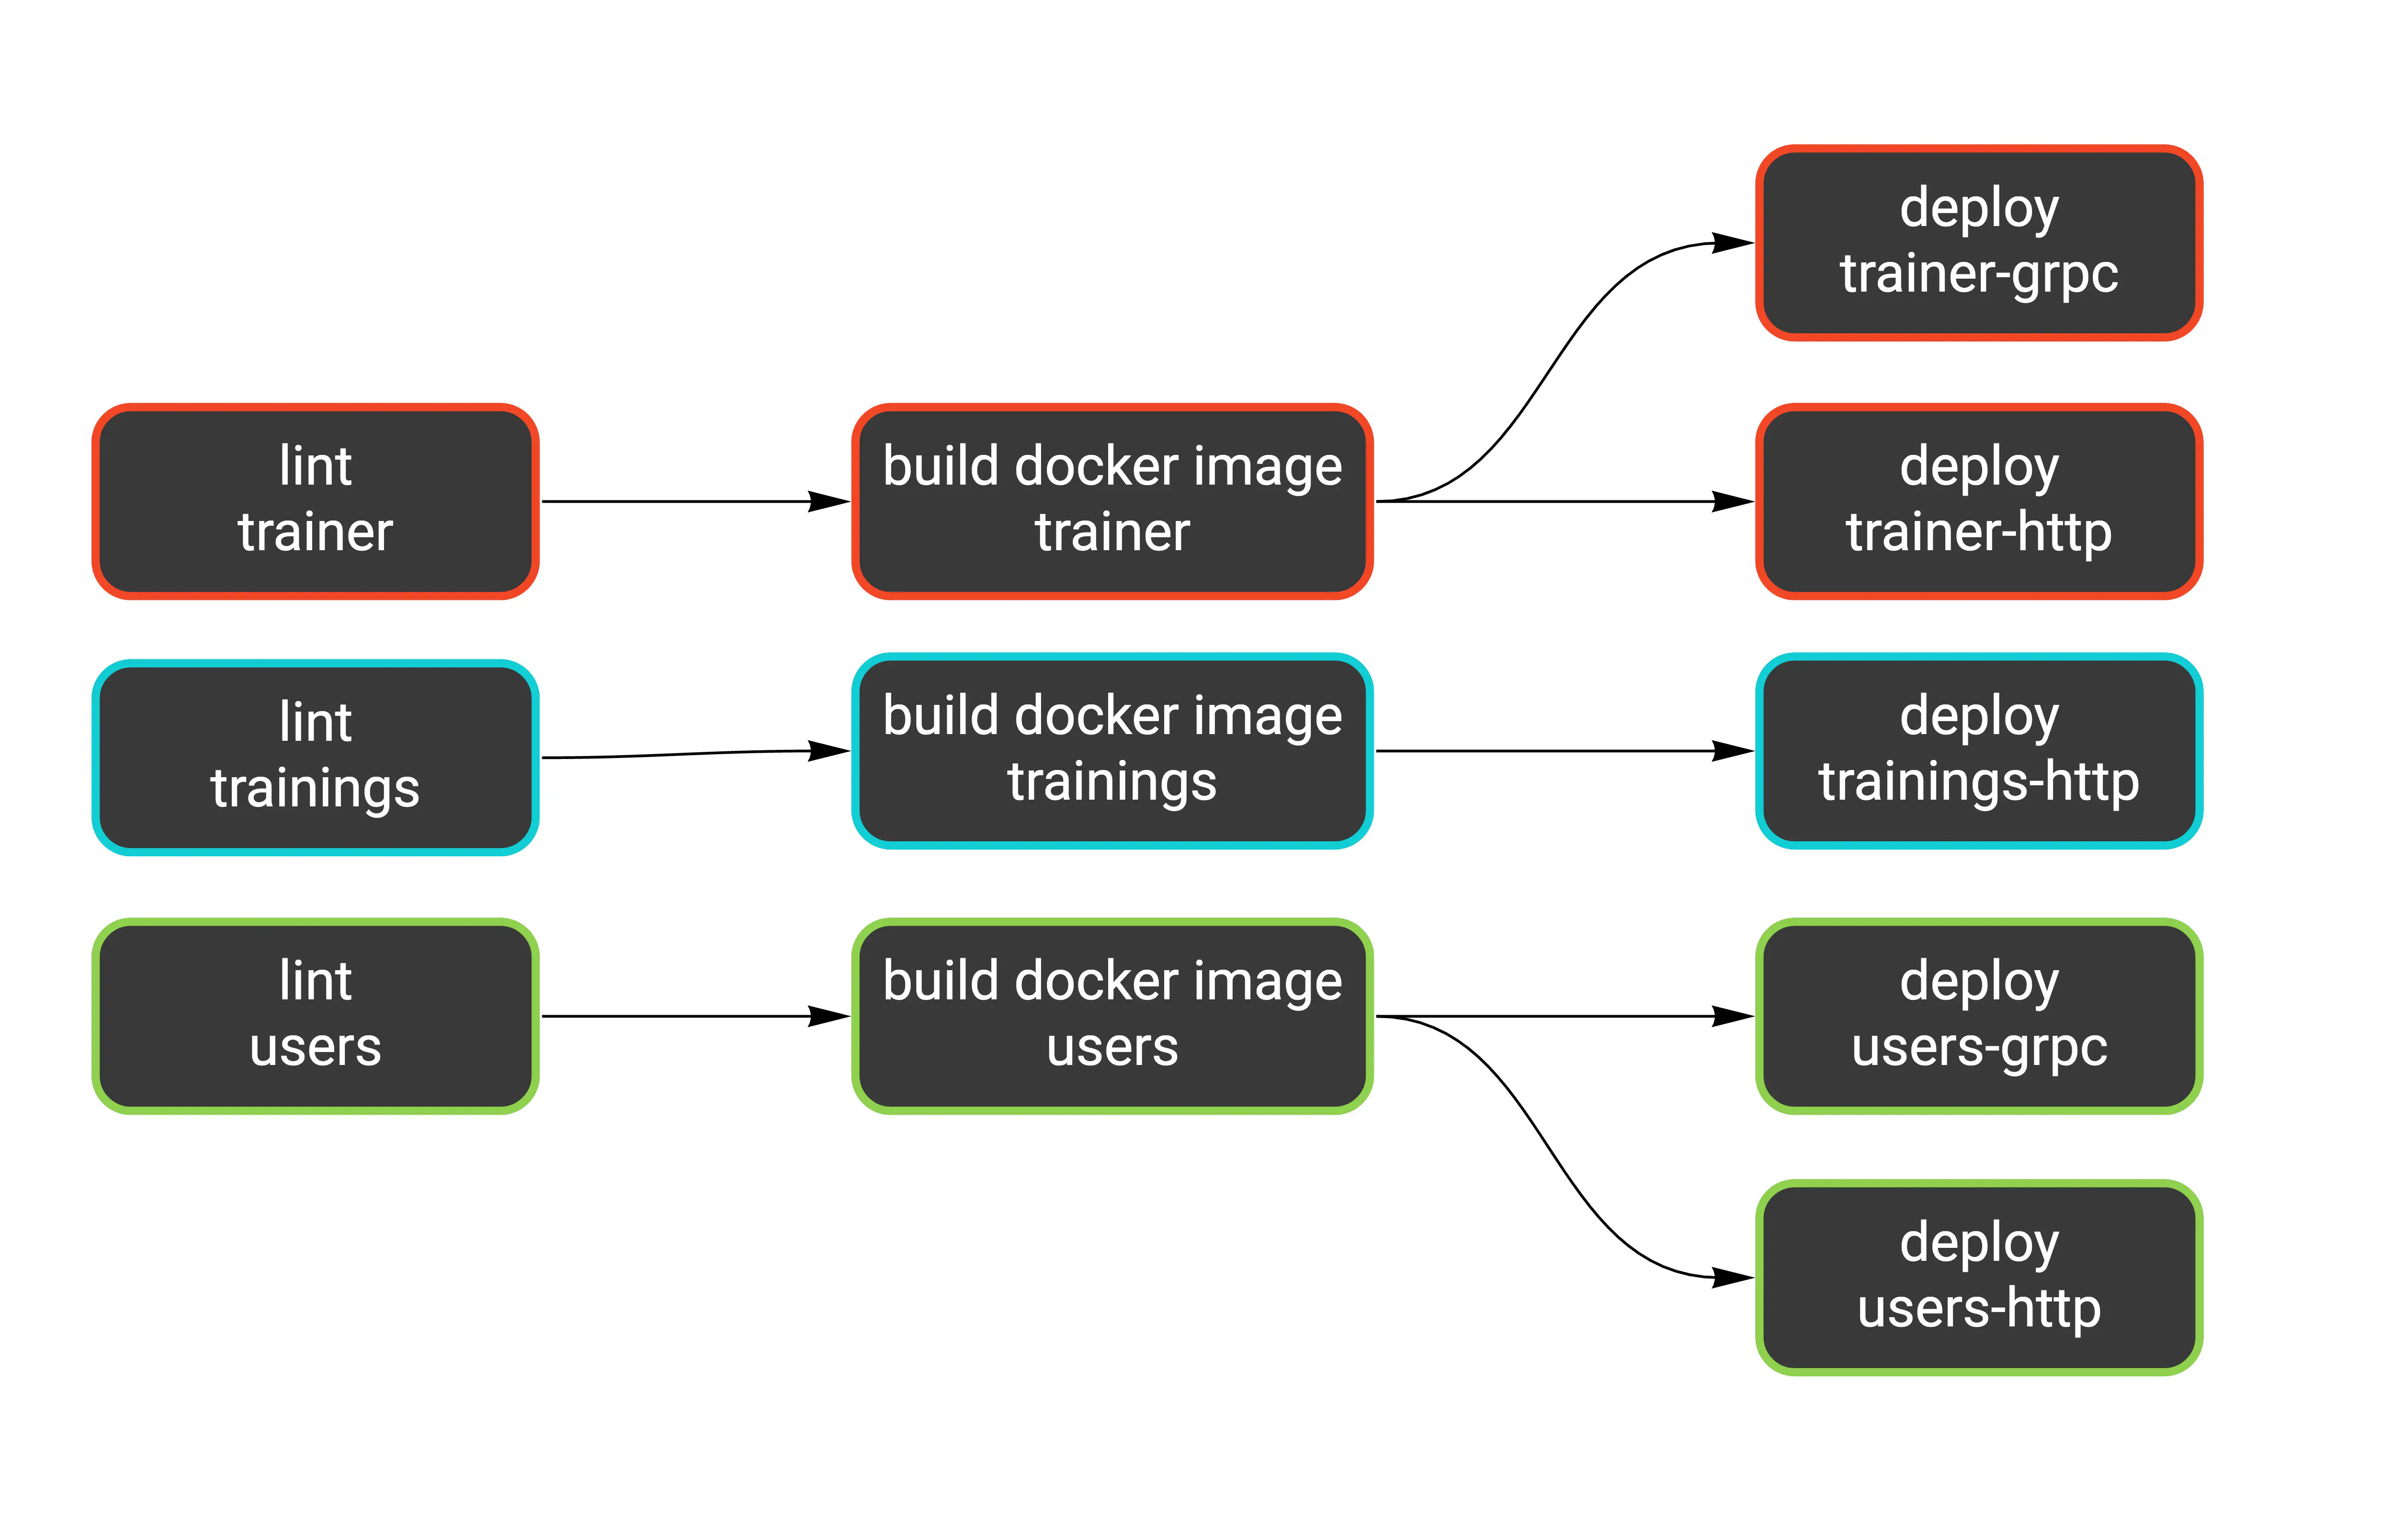
We have a similar workflow for each service: lint (static analysis), build the Docker image, and deploy it as one or two Cloud Run services.
Since our test suite is ready and works locally, we need to figure out how to plug it into the pipeline.
Docker Compose
We already have one docker-compose definition, and I would like to keep it this way. We will use it for:
- running the application locally,
- running tests locally,
- running tests in the CI.
These three targets have different needs. For example, when running the application locally, we want
hot code reloading. But that’s pointless in CI. On the other hand, we can’t expose ports on localhost in CI,
which is the easiest way to reach the application in the local environment.
Luckily, docker-compose is flexible enough to support all these use cases. We’ll use a base docker-compose.yml file
and an additional docker-compose.ci.yml file with overrides just for CI. You can run it by passing
both files using the -f flag (notice there’s one flag for each file). Keys from the files merge in the
order provided.
docker-compose -f docker-compose.yml -f docker-compose.ci.yml up -d
Note
Typically, docker-compose looks for the docker-compose.yml file in the current directory or parent directories.
Using the -f flag disables this behavior, so only specified files are parsed.
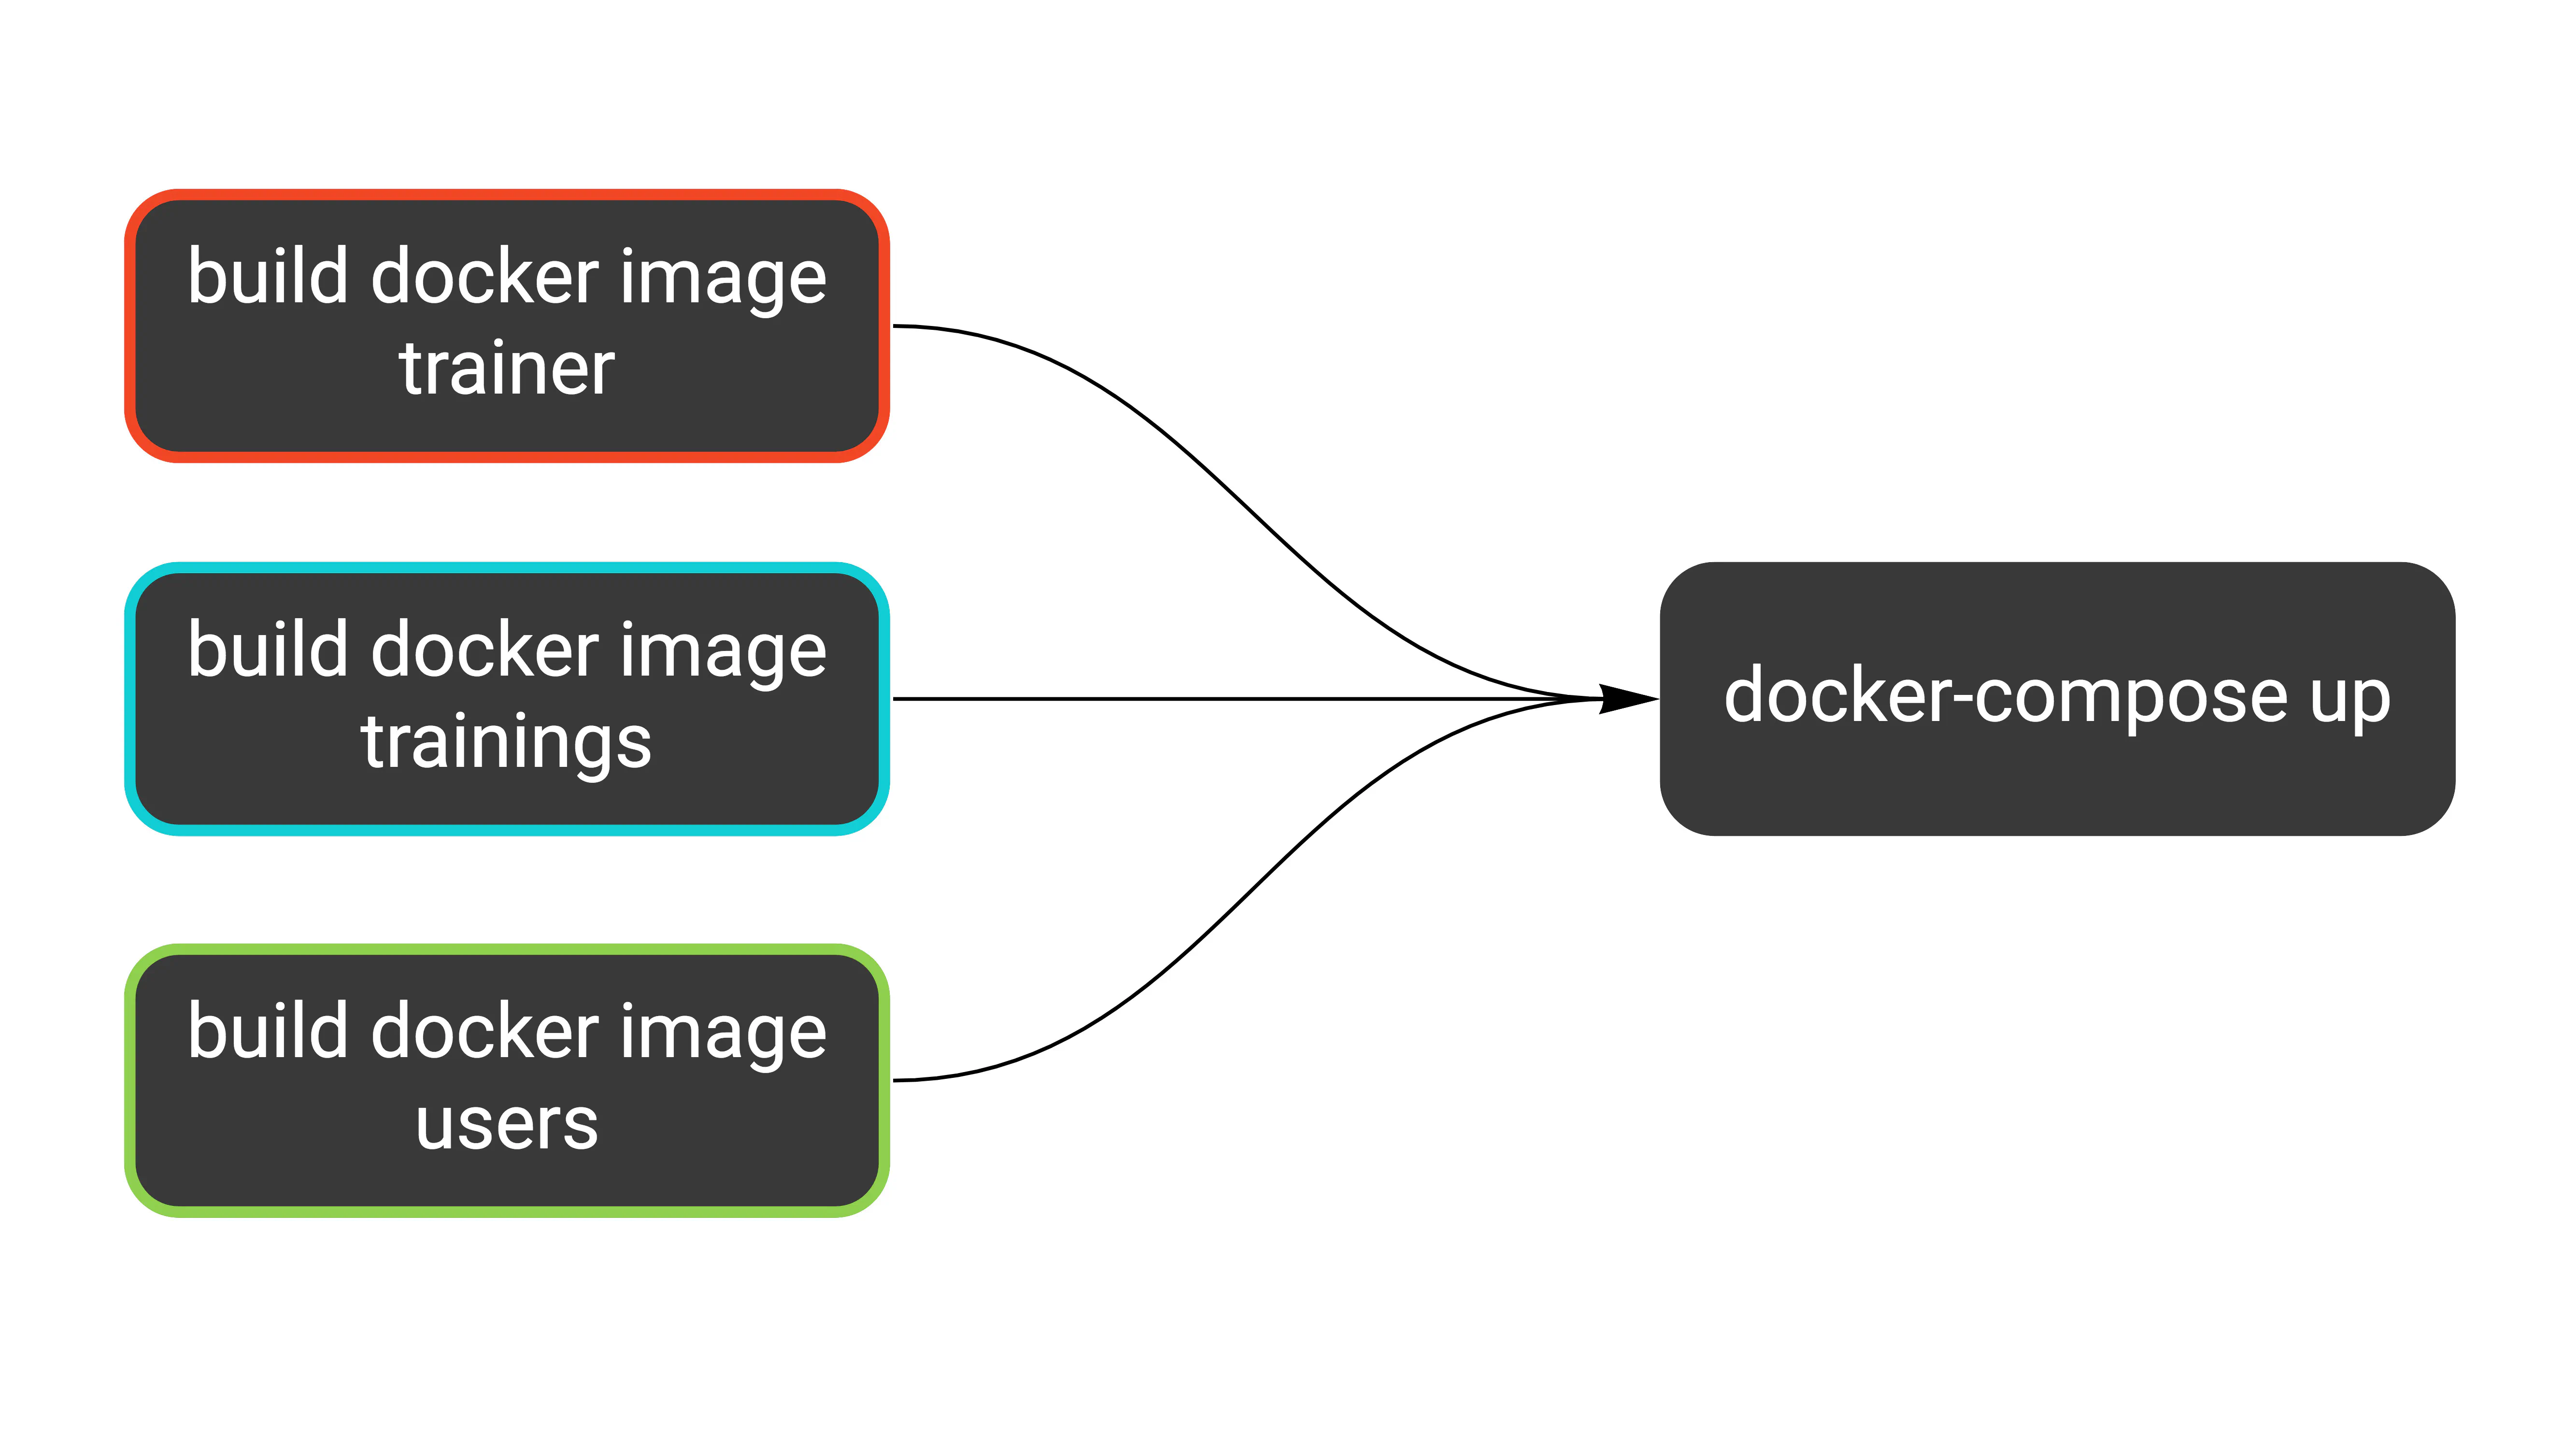
To run this on Cloud Build, we can use the docker/compose image.
- id: docker-compose
  name: 'docker/compose:1.19.0'
  args: ['-f', 'docker-compose.yml', '-f', 'docker-compose.ci.yml', 'up', '-d']
  env:
    - 'PROJECT_ID=$PROJECT_ID'
  waitFor: [trainer-docker, trainings-docker, users-docker]
Since we filled waitFor with proper step names, we can be sure the correct images are present. Here’s what we just added:
The first override we add to docker-compose.ci.yml makes each service use Docker images by tag instead of building from docker/app/Dockerfile.
This ensures our tests check the same images we’re going to deploy.
Note the ${PROJECT_ID} variable in the image keys. This needs to be the production project, so we can’t hardcode it
in the repository. Cloud Build provides this variable in each step, so we pass it to the docker-compose up command (see the definition above).
services:
  trainer-http:
    image: "gcr.io/${PROJECT_ID}/trainer"

  trainer-grpc:
    image: "gcr.io/${PROJECT_ID}/trainer"

  trainings-http:
    image: "gcr.io/${PROJECT_ID}/trainings"

  users-http:
    image: "gcr.io/${PROJECT_ID}/users"

  users-grpc:
    image: "gcr.io/${PROJECT_ID}/users"
Network
Many CI systems use Docker today, typically running each step inside a container with the chosen image. Using docker-compose in CI is a bit trickier, as it usually means running Docker containers from within a Docker container.
On Google Cloud Build, all containers live inside the cloudbuild network.
Adding this network as the default for our docker-compose.ci.yml is enough for CI steps to connect to the docker-compose services.
Here’s the second part of our override file:
networks:
  default:
    external:
      name: cloudbuild
Environment variables
Using environment variables for configuration seems simple at first, but it quickly becomes complex considering how many scenarios we need to handle. Let’s list all of them:
- Running the application locally
- Running component tests locally
- Running component tests in CI
- Running end-to-end tests locally
- Running end-to-end tests in CI
I didn’t include running the application on production, as it doesn’t use docker-compose.
Why are component and end-to-end tests separate scenarios? Component tests spin up services on demand, while end-to-end tests communicate with services already running within docker-compose. This means both types use different endpoints to reach the services.
Note
For more details on component and end-to-end tests, see the previous article. The short version: we focus coverage on component tests, which don't include external services. End-to-end tests just confirm the contract isn't broken at a high level, and only for the most critical path. This is the key to decoupled services.
We already keep a base .env file that holds most variables. It’s passed to each service in the docker-compose definition.
Additionally, docker-compose loads this file automatically when it finds it in the working directory. This lets us use the variables inside the YAML definition as well.
services:
  trainer-http:
    build:
      context: docker/app
    ports:
      # The $PORT variable comes from the .env file
      - "127.0.0.1:3000:$PORT"
    env_file:
      # All variables from .env are passed to the service
      - .env
    # (part of the definition omitted)
We also need these variables loaded when running tests. That’s pretty easy to do in bash:
source .env
# exactly the same thing
. .env
However, the variables in our .env file have no export prefix, so they won’t be passed to applications
running in the shell. We can’t use the prefix because it’s incompatible with the syntax docker-compose expects.
Additionally, we can’t use a single file for all scenarios. We need variable overrides, just as we did
with the docker-compose definition. My idea is to keep one additional file for each scenario, loaded
together with the base .env file.
Let’s see the differences between all scenarios. For clarity, I’ve included only users-http, but the idea applies to all services.
| Scenario | MySQL host | Firestore host | users-http address | File |
|---|---|---|---|---|
| Running locally | localhost | localhost | localhost:3002 | .env |
| Local component tests | localhost | localhost | localhost:5002 | .test.env |
| CI component tests | mysql | firestore-component-tests | localhost:5002 | .test.ci.env |
| Local end-to-end tests | - | - | localhost:3002 | .e2e.env |
| CI end-to-end tests | - | - | users-http:3000 | .e2e.ci.env |
Services run by docker-compose use ports 3000+, and component tests start services on ports 5000+. This way, both can run at the same time.
I created a bash script that reads the variables and runs tests. Please don’t try to define such a complex scenario directly in the Makefile. Make is terrible at managing environment variables. Your mental health is at stake.
Another reason for creating a dedicated script is that we keep three services in one repository and end-to-end tests in a separate directory. If I need to run the same command multiple times, I prefer calling a script with two variables rather than a long incantation of flags and arguments.
A third argument in favor of separate bash scripts: they can be linted with shellcheck.
#!/bin/bash
set -e

readonly service="$1"
readonly env_file="$2"

cd "./internal/$service"
env $(cat "../../.env" "../../$env_file" | grep -Ev '^#' | xargs) go test -count=1 ./...
The script runs go test in the given directory with environment variables loaded from .env and the specified file.
The env / xargs trick passes all variables to the following command. Notice how we remove comments from the file with grep.
Note
Testing cache
go test caches successful results, as long as the related files are not modified.
With tests that use Docker, you might change something at the infrastructure level, like the
docker-compose definition or some environment variables. go test won’t detect this, and you can mistake
a cached test for a successful one.
It’s easy to get confused by this, and since our tests are fast anyway, we can disable the cache.
The -count=1 flag is an idiomatic (though not obvious) way to do it.
Running tests
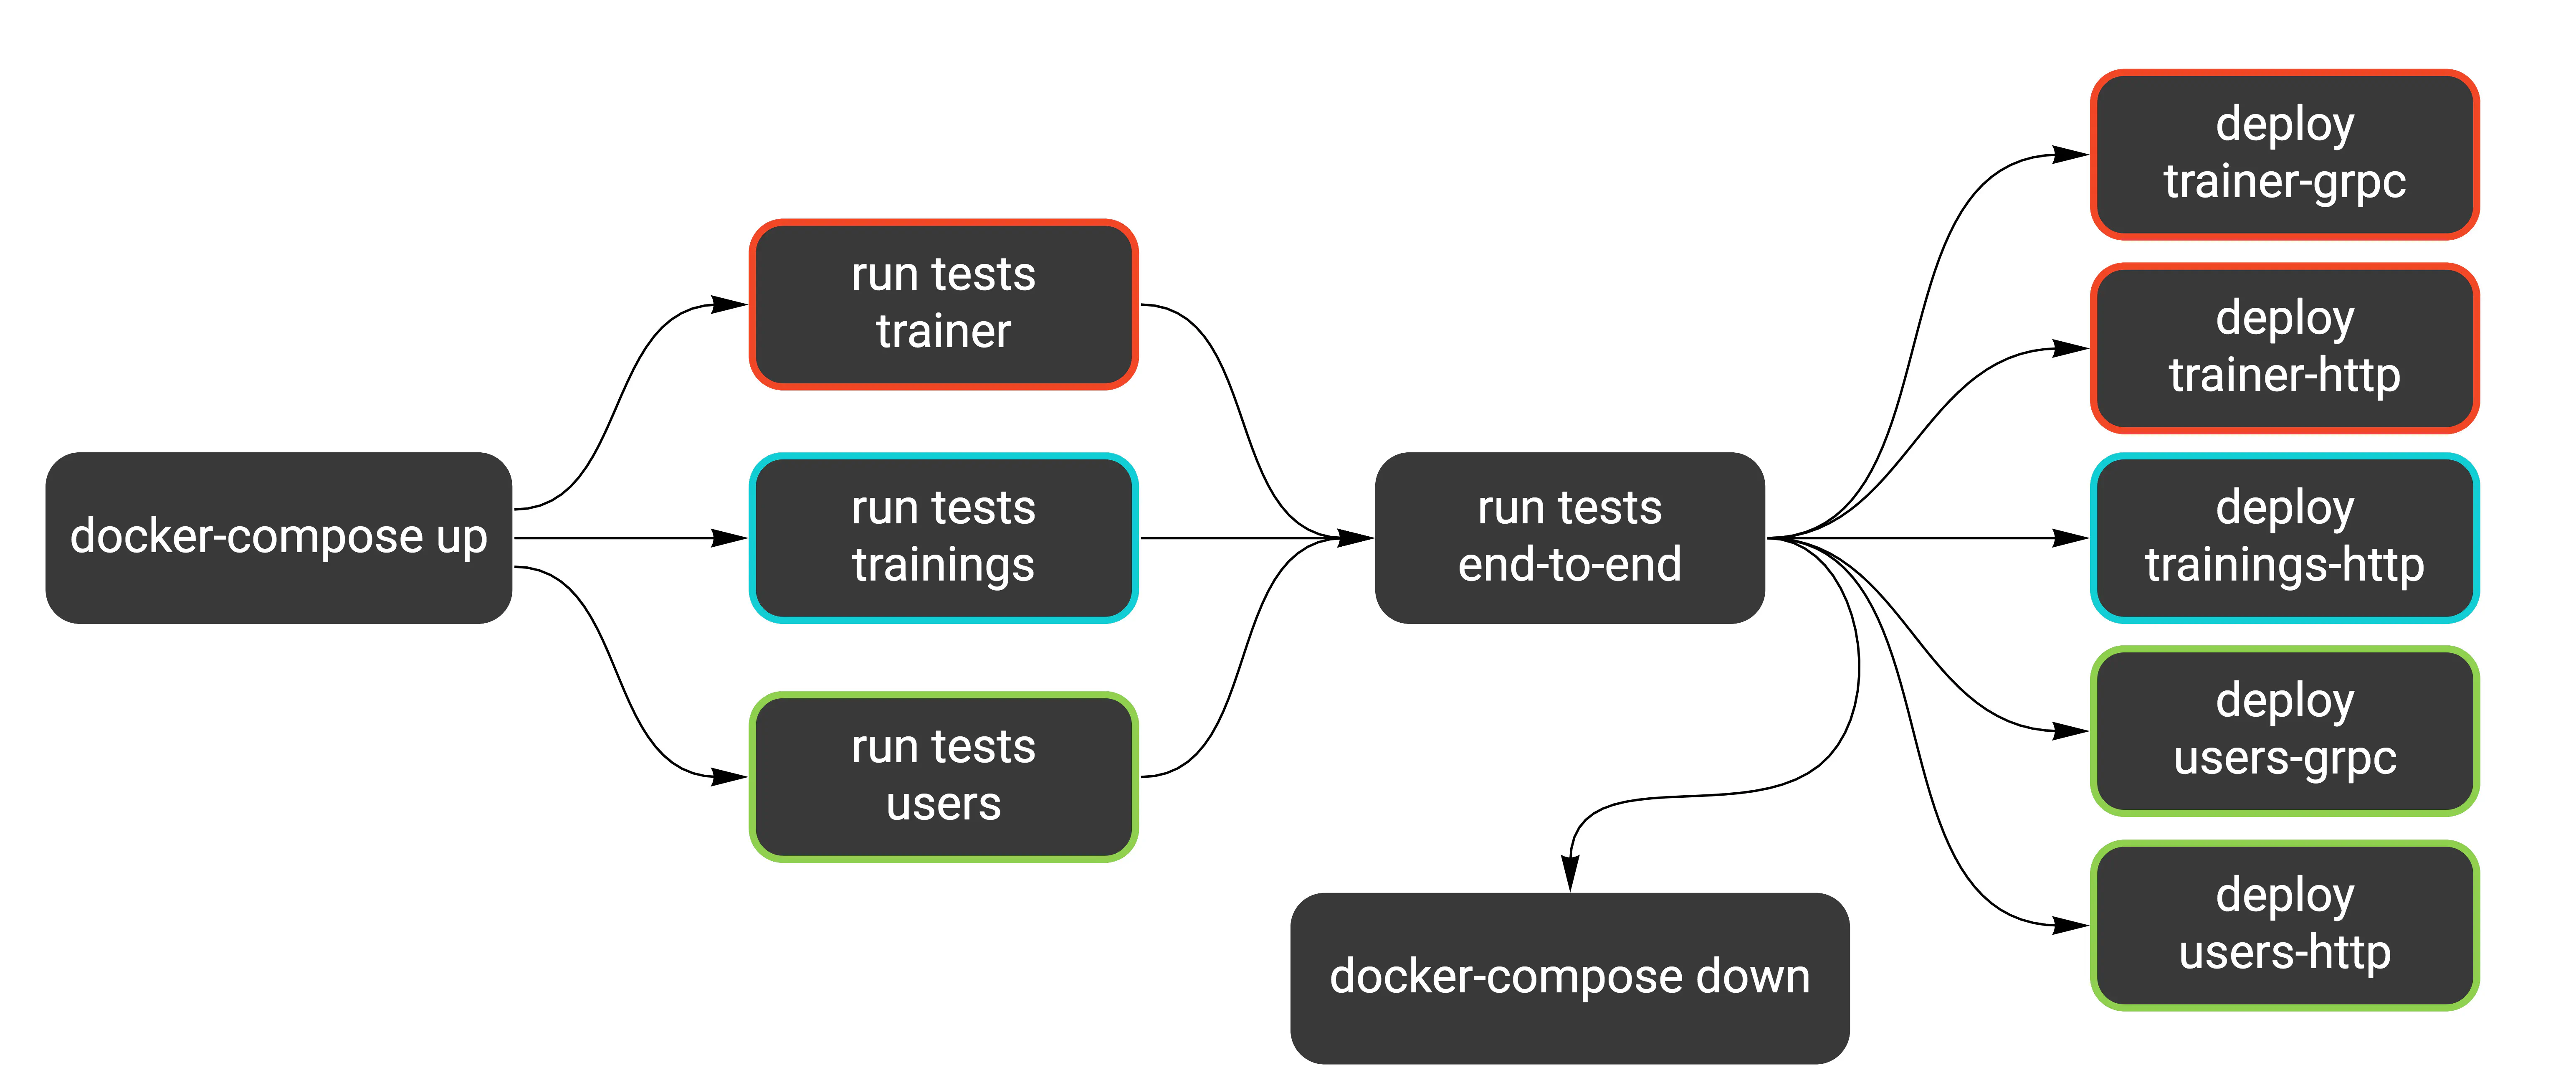
I have the end-to-end tests running after tests for all services pass. This should resemble how you would typically run them. Remember, end-to-end tests should serve as a double-check, and each service’s own tests should have the most coverage.
Because our end-to-end tests are small in scope, we can run them before deploying the services. If they ran for a long time, this could block our deployments. A better approach in that scenario would be to rely on each service’s component tests and run the end-to-end suite in parallel.
- id: trainer-tests
  name: golang
  entrypoint: ./scripts/test.sh
  args: ["trainer", ".test.ci.env"]
  waitFor: [docker-compose]
- id: trainings-tests
  name: golang
  entrypoint: ./scripts/test.sh
  args: ["trainings", ".test.ci.env"]
  waitFor: [docker-compose]
- id: users-tests
  name: golang
  entrypoint: ./scripts/test.sh
  args: ["users", ".test.ci.env"]
  waitFor: [docker-compose]
- id: e2e-tests
  name: golang
  entrypoint: ./scripts/test.sh
  args: ["common", ".e2e.ci.env"]
  waitFor: [trainer-tests, trainings-tests, users-tests]
The last thing we add is running docker-compose down after all tests pass. This is just cleanup.
- id: docker-compose-down
  name: 'docker/compose:1.19.0'
  args: ['-f', 'docker-compose.yml', '-f', 'docker-compose.ci.yml', 'down']
  env:
    - 'PROJECT_ID=$PROJECT_ID'
  waitFor: [e2e-tests]
The second part of our pipeline looks like this now:
Here’s how running the tests locally looks (I introduced this make target in the previous article).
The commands are exactly the same as in CI, just with different .env files.
test:
    @./scripts/test.sh common .e2e.env
    @./scripts/test.sh trainer .test.env
    @./scripts/test.sh trainings .test.env
    @./scripts/test.sh users .test.env
Separating tests
Looking at the table from the previous article, we could split tests into two groups based on whether they use Docker.
| Feature | Unit | Integration | Component | End-to-End |
|---|---|---|---|---|
| Docker database | No | Yes | Yes | Yes |
Unit tests are the only category not using a Docker database, while integration, component, and end-to-end tests do.
Even though we made all our tests fast and stable, setting up Docker infrastructure adds some overhead. It’s helpful to run all unit tests separately as a first guard against mistakes.
We could use build tags to separate tests that don’t use Docker. You can define the build tags in the first line of a file.
// +build docker
We could now run unit tests separately from all tests. For example, the command below would run only tests that need Docker services:
go test -tags=docker ./...
Another way to separate tests is using the -short flag and checking testing.Short() in each test case.
In the end, I decided not to introduce this separation. Our tests are stable and fast enough that running them all at once is not an issue. However, our project is small, and the test suite covers just the critical paths. As it grows, it might be a good idea to introduce build tags in component tests.
Digression: A short story about CI debugging
While I was making changes for this post, the initial test runs on Cloud Build kept failing. According to the logs, tests couldn’t reach services from docker-compose.
I started debugging and added a simple bash script that would connect to the services via telnet.
To my surprise, connecting to mysql:3306 worked correctly, but firestore:8787 didn’t, and the same for all
Wild Workouts services.
I thought this was because docker-compose takes a long time to start, but any number of retries didn’t help. Finally, I decided to try something crazy and set up a reverse SSH tunnel from one of the containers in docker-compose.
This let me SSH into one of the containers while the build was still running.
I then tried telnet and curl, and they worked correctly for all services.
Finally, I spotted a bug in the bash script I used.
readonly host="$1"
readonly port="$1"

# (some retries code)

telnet "$host" "$port"
The typo in the variable definition caused the telnet command to run like this: telnet $host $host. So why did it work for MySQL?
It turns out telnet recognizes ports defined in /etc/services. So telnet mysql mysql got translated to telnet mysql 3306
and worked fine, but it failed for any other service.
But why did the tests fail? Well, it turned out to be a totally different reason.
Originally, we connected to MySQL like this:
config := mysql.Config{
   Addr:      os.Getenv("MYSQL_ADDR"),
   User:      os.Getenv("MYSQL_USER"),
   Passwd:    os.Getenv("MYSQL_PASSWORD"),
   DBName:    os.Getenv("MYSQL_DATABASE"),
   ParseTime: true, // with that parameter, we can use time.Time in mysqlHour.Hour
}

db, err := sqlx.Connect("mysql", config.FormatDSN())
if err != nil {
    return nil, errors.Wrap(err, "cannot connect to MySQL")
}
I looked into environment variables, and all of them were filled correctly.
After adding some fmt.Println() debugs, I found that the config’s Addr part is completely ignored by the MySQL client
because we didn’t specify the Net field. Why did it work for local tests? Because MySQL was exposed on localhost, which is the default address.
The other test failed to connect to one of the Wild Workouts services, and it turned out to be because I used an incorrect port in the .env file.
Why am I sharing this at all? I think it’s a great example of how working with CI systems can often look. When multiple things can fail, it’s easy to draw wrong conclusions and dig deep in the wrong direction.
When in doubt, I like to reach for basic tools for investigating Linux issues, like strace, curl, or telnet.
That’s also why I set up the reverse SSH tunnel, and I’m glad I did because it seems like a great way to debug issues inside CI.
I feel I’ll use it again sometime. 😄
Summary
We managed to keep a single docker-compose definition for running tests both locally and in the pipeline.
The entire Cloud Build run from git push to production takes 4 minutes.
We used a few clever hacks, but that’s normal when dealing with CI. Sometimes you just can’t avoid adding some bash magic to make things work.
Unlike domain code, hacks in your CI setup shouldn’t hurt too much, as long as there are only a few of them. Just make sure it’s easy to understand what’s going on, so you’re not the only person with all the knowledge.
With this post, we wrap up the first refactoring session of Wild Workouts. We’re going to move on to strategic patterns now. Thanks for reading, and see you soon! 👋